
Greek Lamb Gioulbasi and the traditional Greek Easter Table
🐑 Αρνάκι Γκιούλμπασι και το παραδοσιακό Πασχαλινό Τραπέζι

Greek Lamb Gioulbasi and the traditional Greek Easter Table – Arnaki Gioulbasi kai to paradosiako Paschalino Trapezi
BY: Greek Cooking Made Easy
SUBSCRIBE TO MY YOUTUBE CHANNEL: https://www.youtube.com/greekcookingmadeeasy
Check my YouTube Video: HERE
Κοιτάξτε επίσης την συνταγή μου σε YouTube βίντεο, το λίνκ είναι: ΕΔΩ
Serves 7-8 people
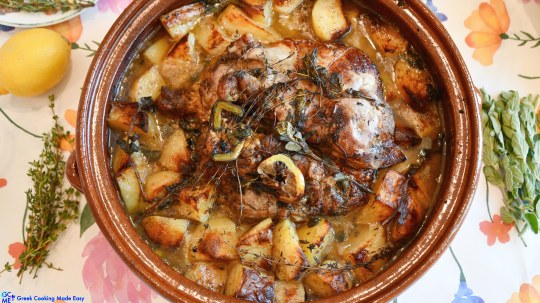
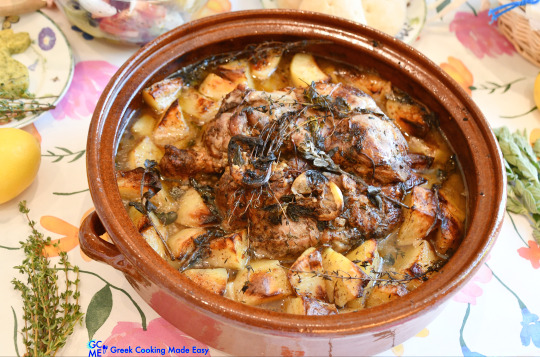
Gioulbasi, according to the traditional Recipe from the Greeks of Asia Minor (Constantinople), is prepared mainly with lamb but sometimes with the addition of pork and beef.
Lamb is baked slowly with garlic, potatoes and pieces of hard, sharp, aged Greek cheese.
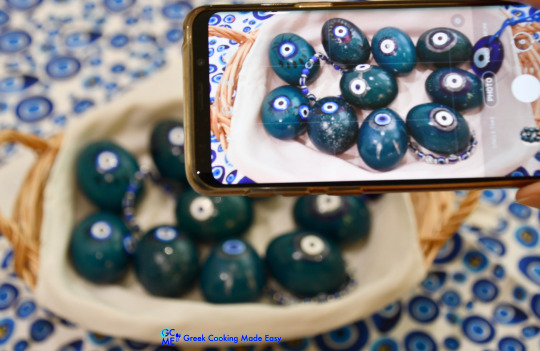
In my Recipe you will see how to prepare it only with lamb, but at the same time I show you how to paint your Easter eggs and decorate them with "the Evil eye", as well as other ideas for your Greek Easter Sunday table.
Easter signifies nature’s rebirth and Love, which warms our hearts with the light of the Resurrection. It is also a grand feast that brings the family together again around a table full of delicious flavors.
The main dish is of course the lamb, which represents the sacrifice of Jesus Christ. I hope you will enjoy all my ideas.
INGREDIENTS FOR THE LAMB GIOULBASI:
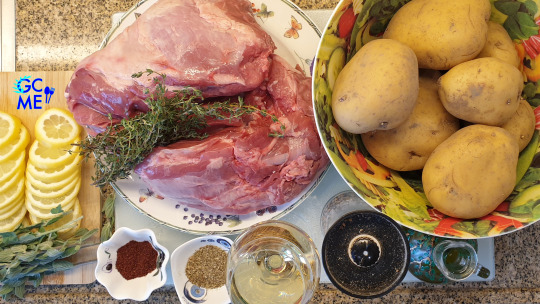
• 2 kg / 4.5 lb Lamb’s leg, boneless
• 1.5 kg / 3 lb 5 oz Potatoes
• 2 Lemons cut into thin slices
• 4-5 sprigs of fresh Thyme
• 3-4 sprigs of fresh Oregano
• 2 tsp. Sumac
• ½ cup / 125 ml Olive oil
• Freshly ground Salt and Pepper
• 1 tsp. dry Oregano
• 1 cup / 250 ml White Wine
• 2-3 cloves Garlic, minced
• 1.5 tbsp. / 22.5 ml Hot Mustard
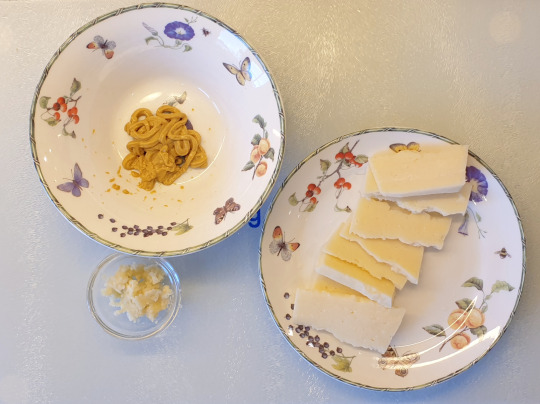
• 100 gr / 3.5 oz Kasseri or Kefalograviera or Arsenico from Naxos, in slices (altern: Pecorino)
• Freshly ground green or black Pepper
• Optional: 1 Red Pepper (capsicum)
METHOD:
A. Prepare the ingredients for Gioulbasi:
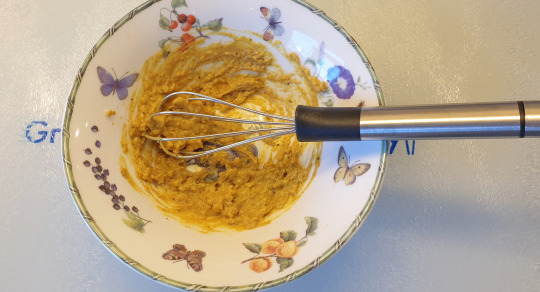
1. Mix together in a bowl the mustard with the minced garlic and plenty of freshly ground pepper.
2. Brush with some oil a large clay pot with lid of 28 cm/11 in. It should be large enough to fit the potatoes as well as the lamb.
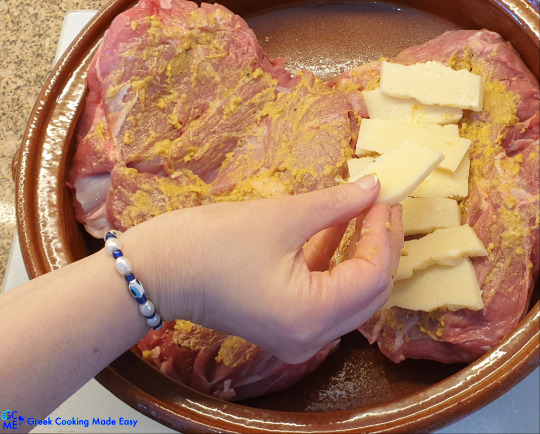
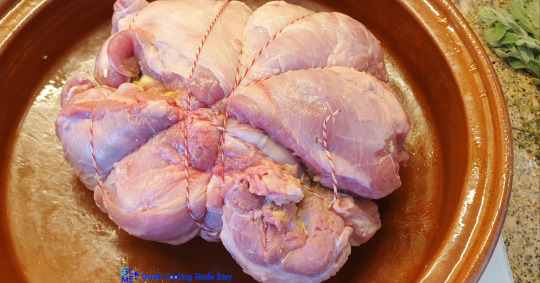
3. Cut the lamb’s leg in half - like a butterfly - and put it as it is, open- in the clay pot.

4. Spread the mustard mixture into the lamb’s opening.
5. Then cover one side with the cheese slices.
6. Fold the lamb in half, to close it.
7. Wrap it with string so that it stays in place. I used also a couple of toothpicks.
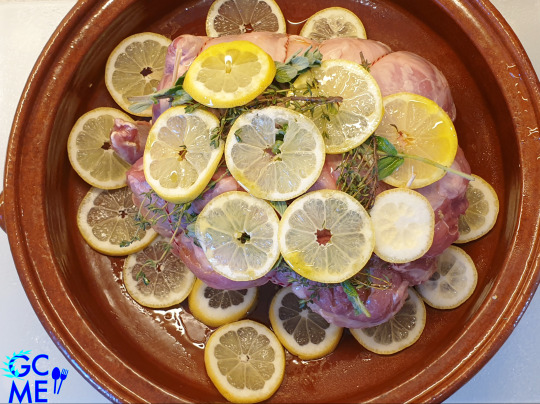
8. Spread half of the sprigs of thyme and oregano on top and cover them with half of the lemon slices.
9. Drizzle the lamb and the pot with ½ of the olive oil.
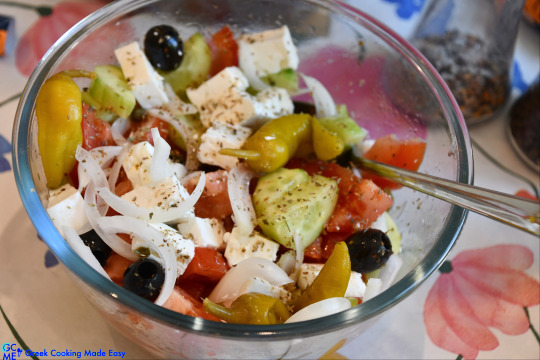
10. Place rest of lemon slices in the clay pot, to sit the potatoes on them.
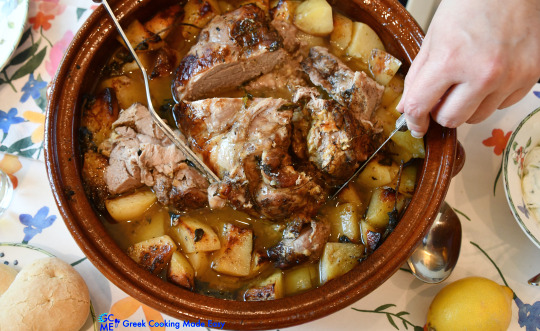
11. Season with salt and pepper, to taste. Reserve.
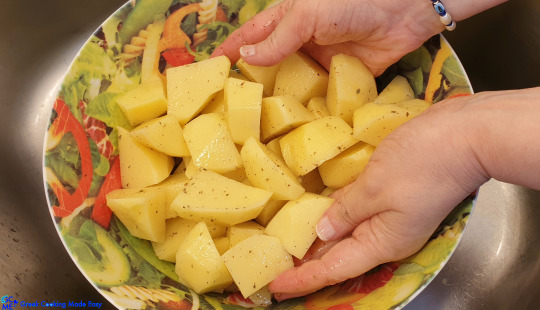
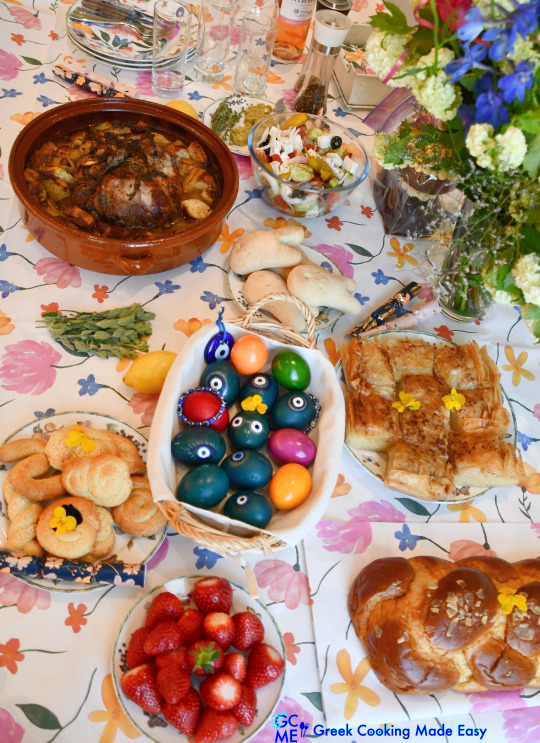
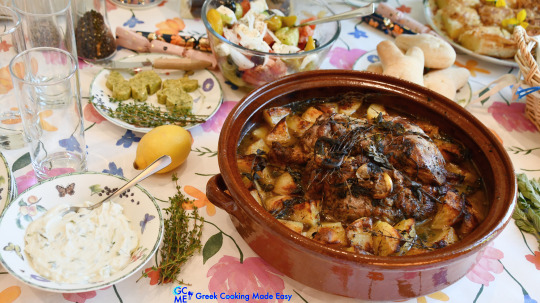
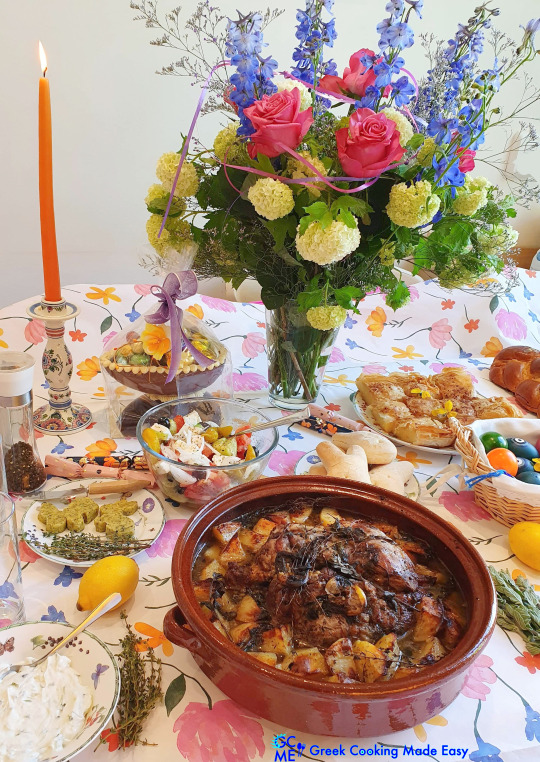
12. Peel the potatoes, rinse them a couple times and cut them into thick chunks.
13. Pour their water. Place them in a large bowl.
14. Pour the other ½ olive oil on top.
15. Season them with plenty salt and pepper.
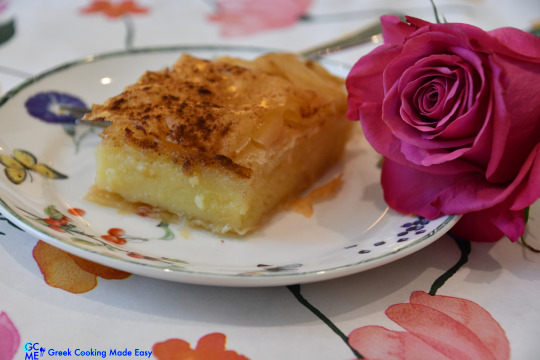
16. Add also the dried oregano and 1 tsp. Sumac.
17. Pour the white wine in the potatoes. Mix the ingredients to go everywhere.
18. Add the rest of the sumac on top of the lamb.
19. Now place the potatoes all around the lamb in the clay pot.
20. Also spread the other half of the sprigs of thyme and oregano over the potatoes.
21. Optionally add the capsicum, cut into large pieces, between the potatoes.
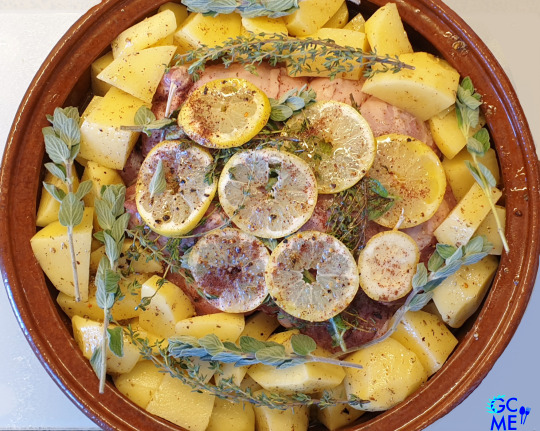
22. Cover the clay pot with the lid. Ready for some slow baking!
B. Baking instructions:
23. Preheat the oven FAN @ 200 ℃ / 400 ℉ for about 10'.
24. When it is well heated, lower the oven temperature @ 180 ℃ / 350 ℉ and place the dish in the oven.
25. Bake Gioulbasi with the lid on, first for 1 hour and 30'.
26. Then remove the lid and bake Gioulbasi for an additional 1 hour (i.e. total baking time of 2 ½ hours).
C. In the meantime, prepare the Easter dyed Eggs with the "Evil Eye":
27. Boil the eggs first: Wash the eggs thoroughly and then boil them over low heat, for 7' for half-boiled or 9' for hard boiled.
28. Remove them from the pot and let them cool down completely before proceeding with the decorating.
29. Fill a deep large bowl with ¾ lukewarm water, vinegar and the blue paint.
30. Now carefully put the eggs in the paint, next to each other, and leave them in the blue color for 5'.
31. After 5', remove the eggs from the paint.
32. Leave them to dry well and cool down.

33. Now decorate your eggs using markers and the round stickers-rings that we use in the folders, to shape the "evil eyes".
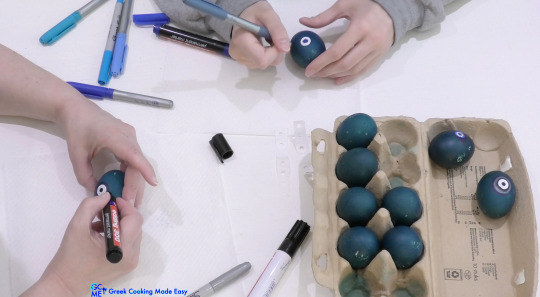
34. Once you are done with the decoration, rub the dyed eggs with kitchen paper with some oil
35. Ρolish them. Place the shiny eggs in the carton box to dry.
36. The more you rub with oil, the shinier they become.
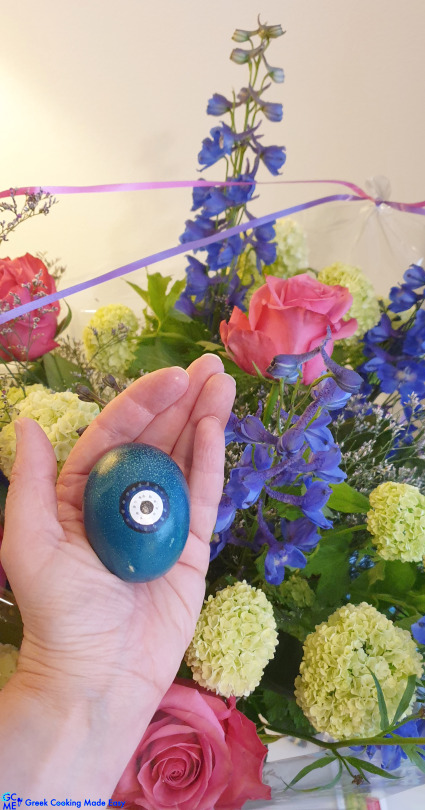
37. The painted eggs with the "Evil eye" are ready!
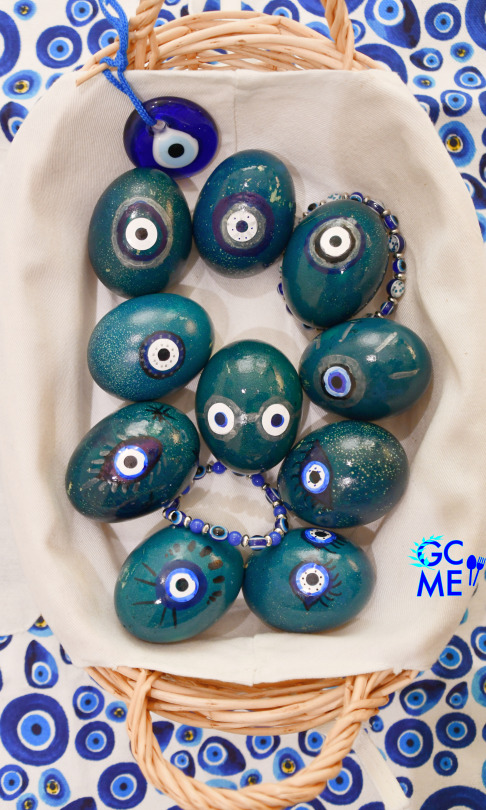
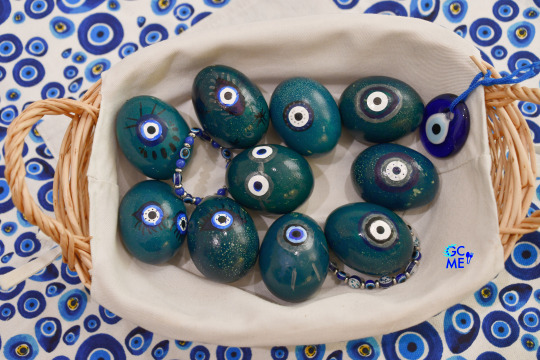
38. You can place them in a nice basket or Easter platter. And of course, decorate them on your Easter table!
39. Halfway through baking, open the oven and turn the potatoes around.
40. For the Easter table, prepare a Greek salad and a fresh Tzatziki. Leave Tzatziki in the refrigerator to cool well.
D. Finish the meal and serve:
41. After 2.5 hours, remove Gioulbasi from the oven.
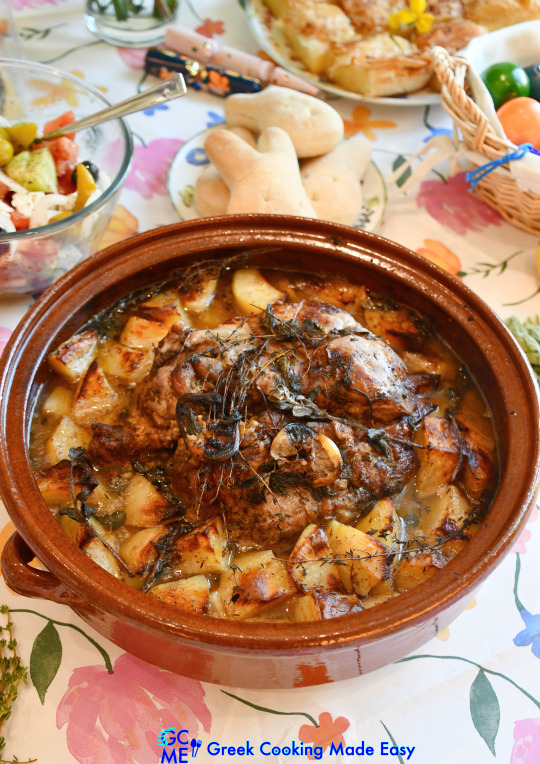
42. Decorate your Easter table with: Gioulbasi as is in the clay pot, in the center of the table, the Greek Salad, Tzatziki, hot buns and fresh butter and dyed eggs. Served with an exquisite rosé refreshing wine.

43. OMG the Lamb Gioulbasi is loukoumi!
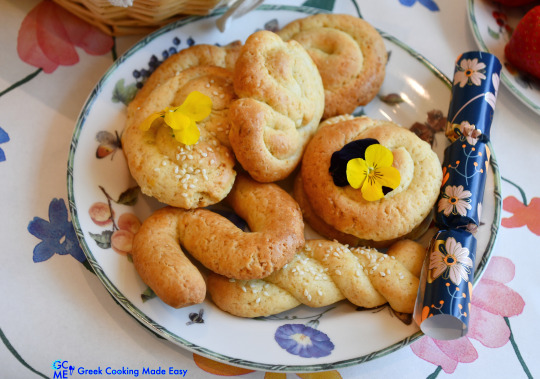
44. Desserts: Easter Smyrneika cookies-Koulourakia, divine Galaktoboureko, chocolate eggs, bowl with fresh strawberries and Easter Sweet Bread-Tsoureki!
Easter Sweet Bread-Tsoureki Recipe HERE

45. Here are my beautiful Smyrneika Koulourakia! Find their Recipe HERE
46. No words can describe my divine Galaktoboureko. Do you happen to want my Recipe??? Lol, of course. Find it HERE
47. Enjoy Greek Easter with all its beautiful traditions. All Easter dishes have a special meaning and unique symbolism.

Looking for other Festive Lamb Dishes-Ideas? Find them all HERE
Hronia polla, Happy Easter!!
Check my YouTube Video: HERE
Αρνάκι Γκιούλμπασι και το παραδοσιακό Πασχαλινό Τραπέζι
BY: Greek Cooking Made Easy
SUBSCRIBE TO MY YOUTUBE CHANNEL: https://www.youtube.com/greekcookingmadeeasy
Σερβίρει 7-8 άτομα
Το Γκιούλμπασι σύμφωνα με τη παραδοσιακή Μικρασιάτικη (Πολίτικη) Συνταγή γίνεται κυρίως με αρνί αλλά κάποιες φορές γίνεται και με την προσθήκη χοιρινού και μοσχαρίσιου κρέατος.
Το ψήσιμο διαρκεί πολύ ώρα μαζί με σκόρδο, πατάτες και κομμάτια σκληρού, αλμυρού τυριού.
Στη Συνταγή μου θα δείτε πώς να το ετοιμάσετε μόνο με αρνί, αλλά συγχρόνως σας δείχνω πώς να βάψετε τα Πασχαλινά αυγά σας και να τα στολίσετε με «μάτι», όπως και άλλες ιδέες για το Πασχαλινό σας τραπέζι.
Το Πάσχα συμβολίζει την αναγέννηση της φύσης και την Αγάπη, που ζεσταίνει με το Αναστάσιμο φως τις καρδιές μας. Είναι επίσης μια μεγάλη γιορτή που φέρνει την οικογένεια κοντά και πάλι γύρω από ένα τραπέζι γεμάτο απολαυστικές γεύσεις.
Κεντρικό πιάτο είναι βέβαια το αρνί, που αντιπροσωπεύει τη θυσία του Ιησού Χριστού.
Ελπίζω να απολαύσετε τις ιδέες μου.
ΥΛΙΚΑ ΓΙΑ ΤΟ ΑΡΝΙ ΓΚΙΟΥΛΜΠΑΣΙ:
2 kg / 4.5 lb Αρνί, μπούτι χωρίς κόκκαλο
1.5 kg / 3 lb 5 oz Πατάτες
2 Λεμόνια κομμένα σε ροδέλες
4-5 κλαδάκια φρέσκο Θυμάρι
3-4 κλαδάκια φρέσκια Ρίγανη
2 κ.γ. Σουμάκ
½ φλ. / 125 ml Ελαιόλαδο
Φρεσκοαλεσμένο Αλάτι και Πιπέρι
1 κ.γ. ξερή Ρίγανη
1 φλ. / 250 ml Λευκό Κρασί
2-3 σκελίδες Σκόρδο, λιωμένο
1,5 κ.σ. / 22,5 ml Μουστάρδα Καυτερή
100 γρ / 3,5 oz Κασέρι ή Κεφαλογραβιέρα ή Αρσενικό Νάξου, σε κομμάτια
Φρεσκοτριμμένο πράσινο ή μαύρο Πιπέρι
Προαιρετικά: 1 Πιπεριά κόκκινη
ΜΕΘΟΔΟΣ:
Α. Ετοιμάστε τα υλικά για το Γκιούλμπασι:
1. Ανακατέψτε μαζί σε ένα μπολάκι τη μουστάρδα με το λιωμένο σκόρδο και μπόλικο φρεσκοτριμμένο πιπέρι.
2. Λαδώστε μια μεγάλη γάστρα (πήλινο) με καπάκι των 28 cm/11 in, αρκετά μεγάλη για να χωράει και τις πατάτες.
3. Κόψτε το αρνίσιο μπούτι στη μέση-σα πεταλούδα-και βάλτε το όπως είναι ανοιχτό στη γάστρα.
4. Αλείψτε το μίγμα μουστάρδας μέσα στο άνοιγμα του αρνιού.
5. Κατόπιν καλύψτε με τα κομμάτια τυριού τη μια μεριά.
6. Διπλώστε το αρνί στα δύο, να κλείσει.
7. Τυλίξτε το με ένα σπάγκο ώστε να μείνει στη θέση του. Εγώ χρησιμοποίησα και 2 μεγάλες οδοντογλυφίδες.
8. Από πάνω απλώστε μισά από τα κλωναράκια θυμάρι και ρίγανη και καλύψτε τα με τις μισές ροδέλες λεμονιού.
9. Περιχύστε το αρνί και το ταψί με το ½ από το ελαιόλαδο.
10. Τοποθετήστε τις υπόλοιπες φέτες λεμονιού μέσα στη γάστρα, για να καθήσουν οι πατάτες πάνω τους.
11. Αλατοπιπερώστε κατά βούληση. Βάλτε στην άκρη.
12. Καθαρίστε, ξεπλύνετε μερικές φορές και κόψτε τις πατάτες σε χοντρά κομμάτια.
13. Χύστε το νερό τους. Βάλτε τις σε ένα μεγάλο μπολ.
14. Ρίξτε από πάνω τους το άλλο ½ ελαιόλαδο.
15. Αλατοπιπερώστε τις καλά.
16. Προσθέστε τη ξερή ρίγανη και το 1 κ.γ. σουμάκ.
17. Ρίξτε μέσα στις πατάτες και το λευκό κρασί. Ανακατέψτε να πάνε τα υλικά παντού.
18. Προσθέστε πάνω από το αρνί το υπόλοιπο σουμάκ.
19. Τώρα βάλτε τις πατάτες γύρω από το αρνί μέσα στη γάστρα.
20. Επίσης απλώστε πάνω από τις πατάτες τα άλλα μισά κλωναράκια θυμάρι και ρίγανη.
21. Προαιρετικά προσθέστε και τη πιπεριά, κομμένη σε μεγάλα κομμάτια ανάμεσα στις πατάτες.
22. Κλείστε τη γάστρα με το καπάκι. Έτοιμο για αργό ψήσιμο!
Β. Οδηγίες ψησίματος:
23. Προθερμάνετε το φούρνο στο ζεστό αέρα @200℃/ 400℉ για περίπου 10'.
24. Μόλις θερμανθεί καλά, κατεβάστε τη θερμοκρασία του φούρνου @180℃/ 350℉ και βάλτε τη γάστρα στο φούρνο.
25. Ψήστε το Γκιούλμπασι με το καπάκι αρχικά για 1 ώρα και 30'.
26. Κατόπιν αφαιρέστε το καπάκι και ψήστε το Γκιούλμπασι για 1 ώρα επιπλέον (δηλ. συνολικό ψήσιμο 2 ½ ώρες).
Γ. Στο μεταξύ, ετοιμάστε τα Πασχαλινά αυγά με το «Μάτι»:
27. Βράστε πρώτα τα αυγά: Πλύντε καλά τα καφέ αυγά και στη συνέχεια βράστε τα σε χαμηλή φωτιά, για μελάτα 7' ή για καλοβρασμένα και σφικτά για 9'.
28. Αφαιρέστε τα από την κατσαρόλα και αφήστε τα να κρυώσουν εντελώς πριν προχωρήσετε με τη βαφή.
29. Γεμίστε ένα βαθύ μεγάλο μπολ κατά 3/4 με χλιαρό νερό, το ξίδι και την μπλέ βαφή.
30. Τώρα βάλτε προσεκτικά τα αυγά μέσα στη βαφή, και αφήστε τα στο μπλέ χρώμα για 5'.
31. Μετά από 5', αφαιρέστε τα αυγά από τη βαφή.
32. Αφήστε τα να στεγνώσουν καλά και να κρυώσουν.
33. Τώρα διακοσμήστε τα αυγά σας χρησιμοποιώντας μαρκαδόρους και τα στρογγυλά αυτοκόλλητα-δακτυλίδια που χρησιμοποιούμε στα ντοσιέ για να φτιάξετε τα «μάτια».
34. Μόλις τελειώσετε με τη διακόσμηση, τρίψτε τα βαμμένα αυγά σας με χαρτί κουζίνας με λίγο λάδι, να γυαλίσουν. Βάλτε τα λαμπερά αυγά στο χάρτινο κουτί αυγών για να στεγνώσουν.
35. Όσο περισσότερο τα τρίβετε με λάδι, τόσο πιο λαμπερά γίνονται.
36. Τα βαμμένα αυγά με το «μάτι» είναι έτοιμα!
37. Μπορείτε να τα τοποθετήσετε σε ένα ωραίο καλάθι ή μια Πασχαλινή πιατέλα.
38. Και φυσικά, διακοσμήστε τα στο Πασχαλινό σας τραπέζι!
39. Στη μέση του ψησίματος, ανοίξτε το φούρνο και αναποδογυρίστε τις πατάτες.
40. Για το Πασχαλινό τραπέζι, ετοιμάστε μια χωριάτικη σαλάτα και ένα φρέσκο Τζατζικάκι. Αυτό αφήστε στο στο ψυγείο να κρυώσει καλά.
Δ. Τελειώστε το φαγητό και σερβίρετε:
41. Μετά από 2.5 ώρες, βγάλτε το Γκιούλμπασι από το φούρνο.
42. Στολίστε το Πασχαλινό σας τραπέζι με: το Γκιούλμπασι όπως είναι στη γάστρα, στο κέντρο του τραπεζιού, Χωριάτικη Σαλάτα, Τζατζίκι, ψωμάκια ζεστά και φρέσκο βούτυρο και τα βαμμένα αυγά. Σερβιρισμένα με ένα εξαίσιο Ροζέ δροσιστικό κρασί.
43. Ω πω πω, το Αρνάκι Γκιούλμπασι έγινε λουκούμι!
44. Γλυκά: Κουλουράκια Σμυρνέικα, θεσπέσιο Γαλακτομπούρεκο, σοκολατένια αυγά, μπολ με φρέσκιες, δροσερές φράουλες και Πασχαλινό Τσουρέκι!
Βρείτε τη Συνταγή μου για Πασχαλινό Τσουρέκι ΕΔΩ
45. Να τα υπέροχα Σμυρνέικα Κουλουράκια μου. Η Συνταγή τους είναι ΕΔΩ
46. Δεν έχω λόγια να περιγράψω το Γαλακτομπούρεκο μου! Μη μου πείτε ότι ψάχνετε τη συνταγή μου, χαχαχα! Και βέβαια, δείτε την ΕΔΩ
47. Απολαύστε το Ελληνικό Πάσχα με όλες τις πανέμορφες παραδόσεις του. Όλα τα Πασχαλινά πιάτα έχουν ιδιαίτερη σημασία και συμβολισμό.
Ψάχνετε άλλες ιδέες για Πασχαλινό Αρνί? Δείτε τις όλες ΕΔΩ
Χρόνια σας Πολλά!!
Κοιτάξτε επίσης την συνταγή μου σε YouTube βίντεο, το λίνκ είναι: ΕΔΩ