
Greek Vassilopita (New Year) or Christmas Cake with dried Fruits and festive Aromas
🥮 Βασιλόπιτα ή Χριστουγεννιάτικο Κέικ με ξερά Φρούτα και Γιορτινά Αρώματα
All festive aromas in one cake
🤶
All festive aromas in one cake 🤶

Greek Vassilopita (New Year’s) or Christmas Cake with dried Fruits and festive Aromas – Vassilopita i Hristougenniatiko Cake me xera Frouta kai Yiortina Arwmata
BY: Greek Cooking Made Easy
SUBSCRIBE TO MY YOUTUBE CHANNEL: https://www.youtube.com/greekcookingmadeeasy
Check my YouTube Video: HERE
Κοιτάξτε επίσης την συνταγή μου σε YouTube βίντεο, το λίνκ είναι: ΕΔΩ
SERVES 🍴⃒ PREP. TIME 🕔⃒
12-16 pers. 30 min.
COOK. TIME ♨ DIFFIC. LEVEL 👩🍳⃒
40 min. Easy
Through the years, I've shown you many versions of the traditional Greek Vassilopita (New Year’s cake), either made like a cake or a bread. It is true that there are many regional variations around Greece.
This time, I will show you another Vassilopita cake, filled with dried fruits, honey, orange, nuts and spices.
It's an easy recipe to follow, but do note a couple secrets in my method.
Honestly this cake could stand as a beautifully moist Christmas Cake (minus the coin) bursting with all the aromas of the Holiday Season!
Let's see together how to prepare this special cake.
Suitable for lacto-ovo vegetarians.
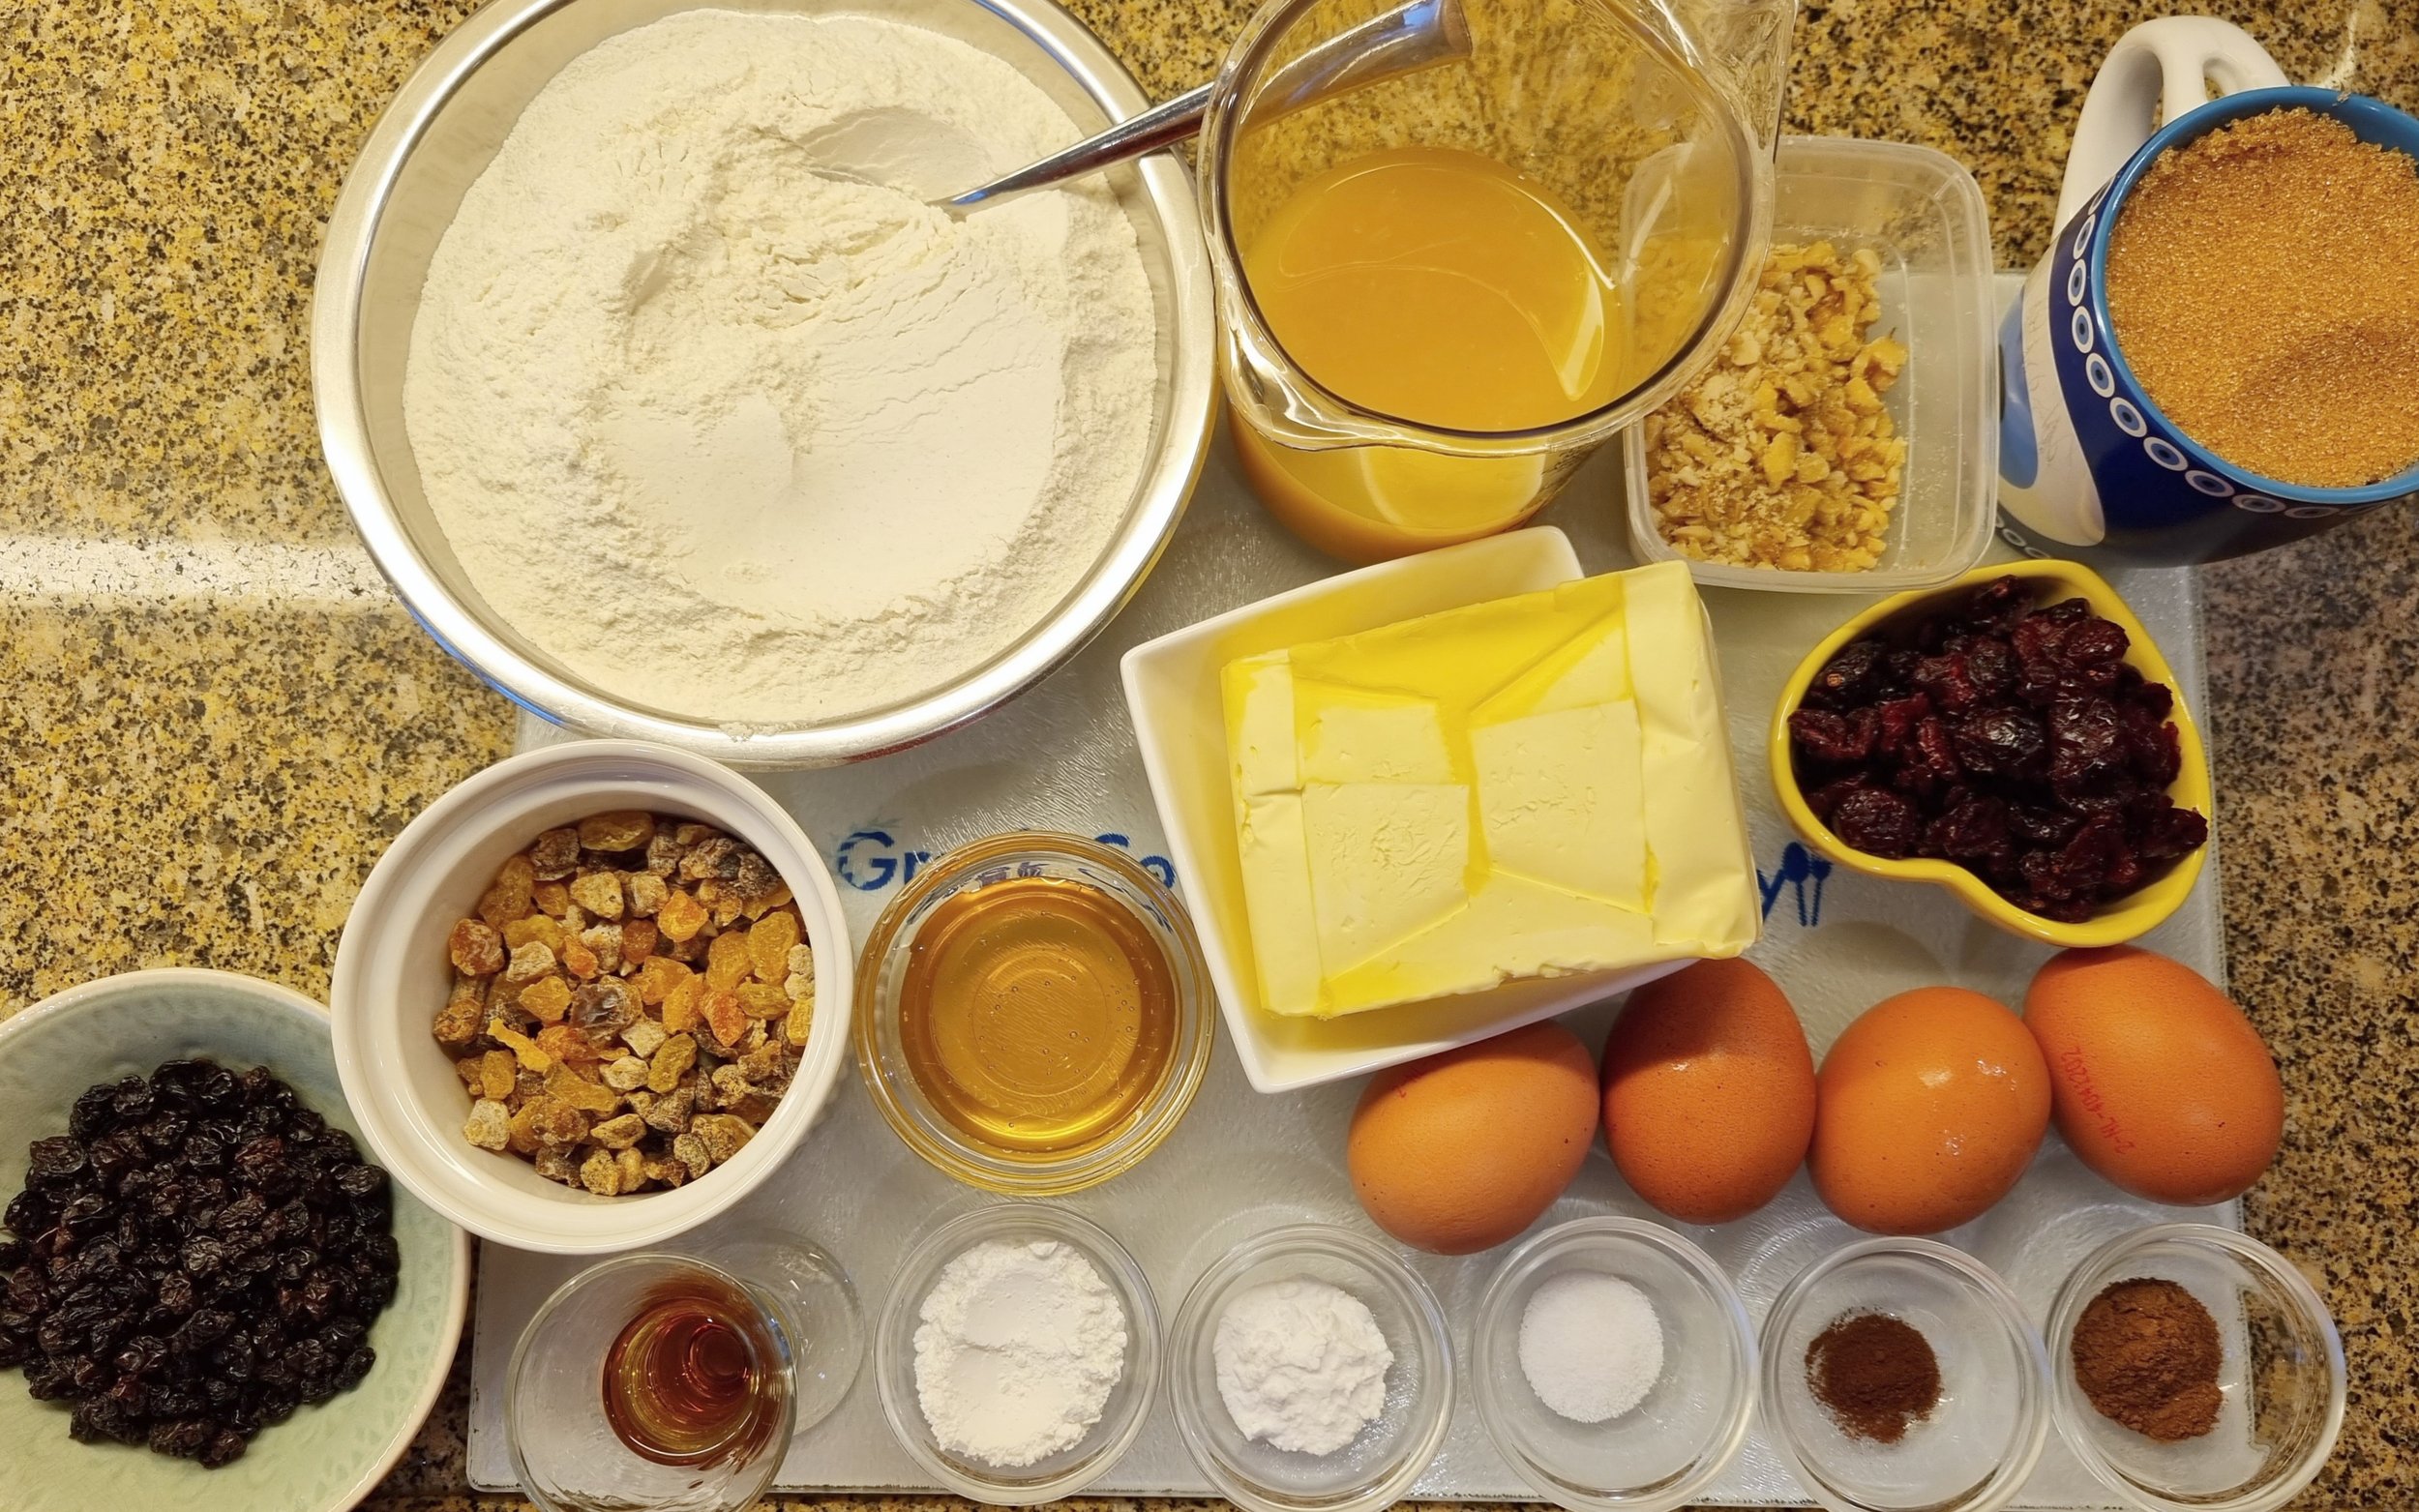
INGREDIENTS
Ingredients for the Cake:
· 360 gr. / 12.7 oz / 3 cups self-raising Flour, sifted
· 250 gr. / 9 oz Butter @ room temperature
· 4 large Eggs @ room temperature
· 225 gr. / 7.9 oz / a bit more than 1 cup light-brown Sugar
· 2 tbsp. / 30 ml Greek Thyme Honey
· 1 shot / 30 ml Brandy (cognac)
· 250 ml / 1 cup fresh Orange Juice
· 1 tsp. Baking Soda
· 1 tbsp. Baking Powder
· 1/2 tsp. Salt
· 1 tsp. ground Cinnamon
· 1/4 tsp. ground Cloves
· 50 gr. / 1.7 oz Mixed Walnuts and Almonds, finely chopped
· 80 gr. / 2.8 oz dried Cranberries
· 80 gr. / 2.8 oz dried Mixed Fruits, chopped: dates, figs and apricots (or prunes)
· 50 gr. / 1.7 oz Currants
Ingredients for garnishing:
· 320 gr. / 11.3 oz / 2 cups Powder Sugar
· 60 ml / 4 tbsp. fresh Orange Juice
· 9 red Candy or Red Berries
· 6-7 twigs Rosemary, cut in small pieces
· 1 Coin

METHOD:
A. Prepare the cake batter:
1. Place the soft butter in the bowl of a strong electric mixer. Start beating it, adding also the light brown sugar.
2. Beat them together in high speed for 5' or until they turn fluffy.
3. Next, crack the 4 eggs in a separate bowl and then add one by one in the mixture.

4. Pour in the honey.
5. In the bowl with sifted flour add the cinnamon, cloves and salt, stirring to blend them in.
6. Stop mixer for a bit. In the bowl with mixed, chopped fruits add the cranberries and currants, blending them together.
7. Take a couple spoonfuls from the flour and add in the mixed fruits, blending it in. Add also the mixed nuts. Reserve.
8. TIP: This is a small trick to keep dried fruits-which are heavy-inside the cake during baking and not to fall at the bottom!

9. Start mixer again in low speed, and gradually fold the sifted flour mix, spoon by spoon into the cake batter, blending it gently.
10. Pour in the brandy.
11. Half way through, put the baking soda into the orange juice and whisk to blend it in.
12. When the juice rises and makes bubbles, pour it in the batter before you continue with rest of flour.
13. Add the dried fruits and nuts mix in the batter and beat enough to blend them in.
14. Just before stopping the mixer, add the baking powder and beat just enough to incorporate it.
15. Brush or spray some oil on a round spring form (with side opening) of 28 cm / 11 in. (bottom and sides) and dust it with a bit of flour.
16. Note: For a thicker cake, you could use a spring form of 26 cm / 10 in.

17. Empty the cake batter into the form and level its surface. It is now ready to be baked.

B. Baking instructions:
18. Place the form in the bottom shelf of a preheated oven, top / bottom heating elements on @ 180℃ / 350℉, and bake the cake for about 40' (depends on the oven).
19. Tip: Don't open the oven before 30’ of baking, as this will result your cake to deflate.
20. After 40', test if the cake is baked through by inserting a knife in the center. It needs to come out clean!
21. Remove the cake, placing it on the kitchen bench so that it cools down. Cake should look fluffy.
22. Tip: You could prepare the cake ahead of time and bake it, and store it in a plastic bag either in the fridge for 1 week or in the freezer for 1 month.

C. Garnishing and decorating Vassilopita:
23. When the cake cools down completely, remove the round tin.
24. Bring a festive, round, serving platter next to it.
25. Prepare and place your coin: Take a small coin and wrap it in aluminum foil.
26. Now invert the cake in a serving platter.
27. Insert the coin through the bottom of the cake and invert the cake once more in to the festive platter.
28. Make an easy icing:
29. Note: The easiest and most common option to decorate is to sprinkle some icing sugar on top.
30. For the easy icing, whisk together the powder sugar with the orange juice.

31. Pour the icing on top of the cake and around the rim so that it will drip around the sides.
32. Then place the small rosemary twigs plus the red candy around the cake to create a wreath.

33. Vassilopita is now ready to be cut and shared at the change of year.

Someone will have good luck next year!


It is served this year with my very own Pomegranate Liqueur.
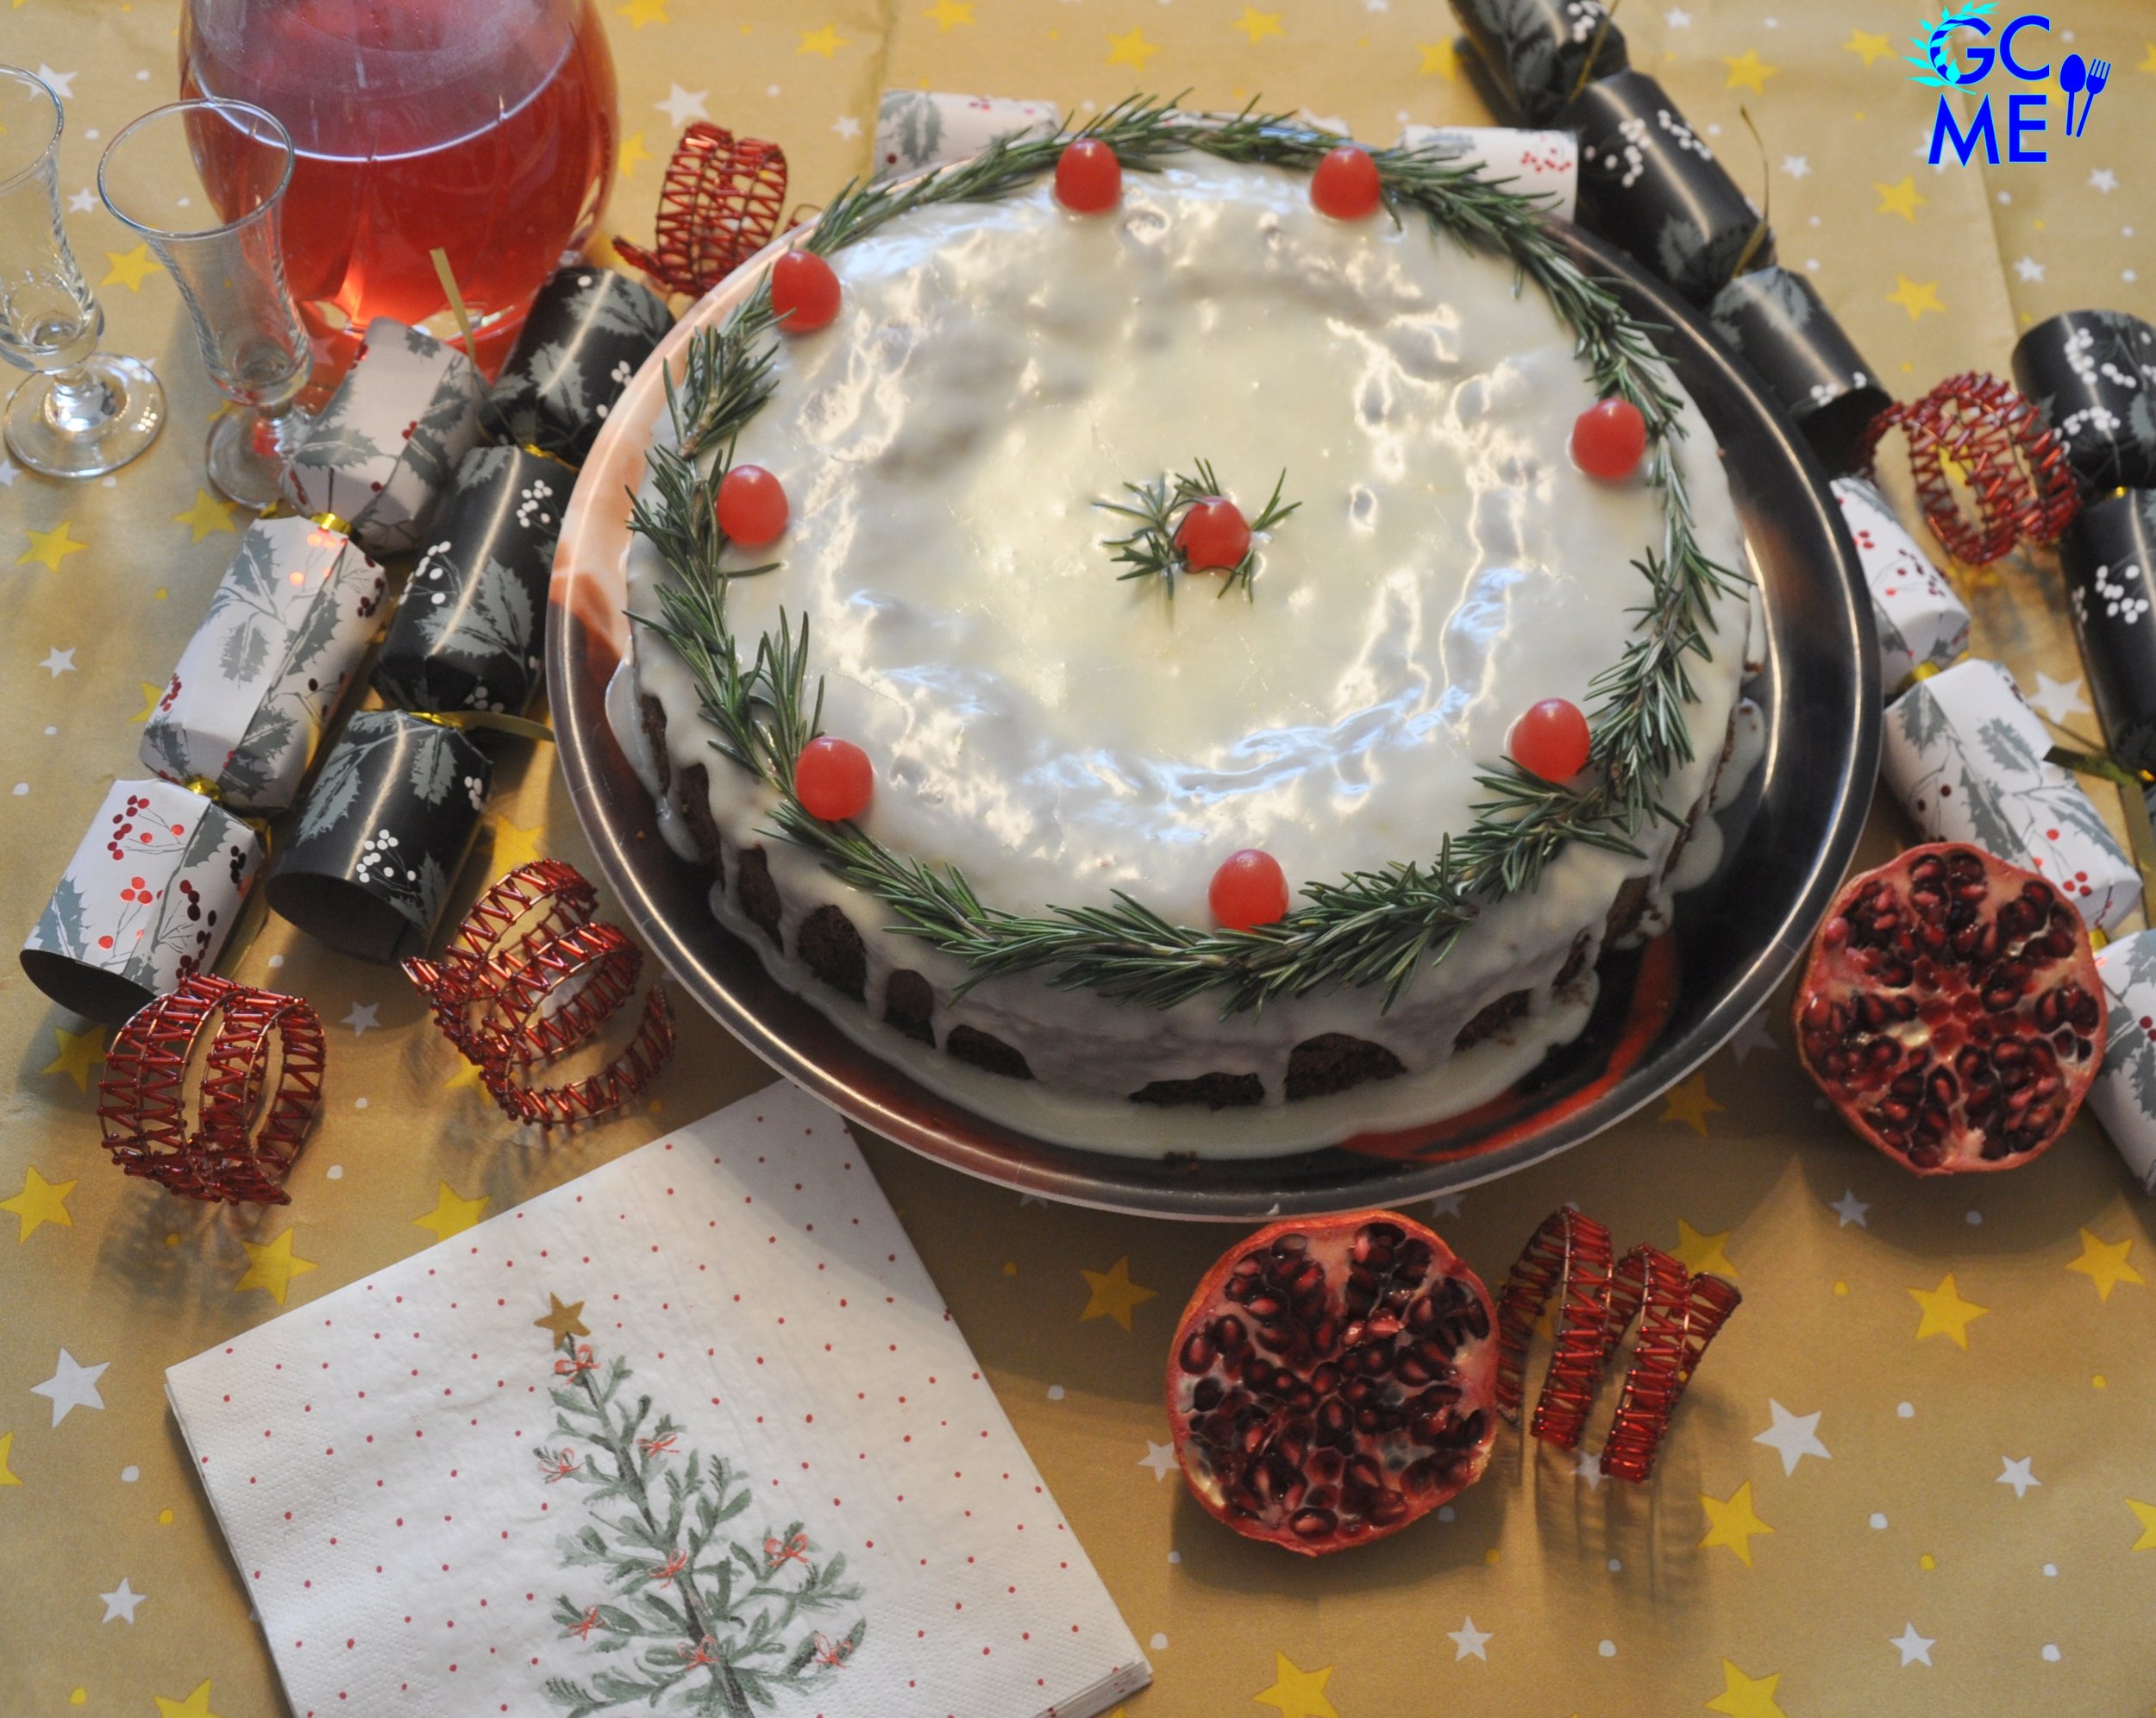
Here is the lucky coin! And look at the inside of this super moist, rich and flavorful cake!


Happy, healthy New Year dear friends! With love always, Deppy!!

D. Storage Info:
Store the Cake in the fridge, covered with plastic wrap. It will stay fresh for 3-4 days. Take it out 2 hours before serving, it’s best at room temp.
E. Greek New Year tradition:
Vassilopita is a very special dessert since it is the last cake of the year that's leaving but also the cake for the beginning of the year to come.
The tradition is that Vassilopita is served at midnight on New Year’s Eve to celebrate Saint Basil (Greece’s equivalent to Santa Claus i.e. St. Nickolas, hence its name Vassilopita). The 2 Saints had some similarities in their lives and you can read more in my Politiki Vassilopita Recipe.

The main attraction is the hidden coin inside the cake, which is believed to bring good luck to the person who finds it in the New Year! So the anticipation & suspense of who will get the lucky coin is huge amongst the guests of the house!
This wonderful Greek custom usually carries on in the next couple of months in offices, clubs and schools.
Check my YouTube Video: HERE
Βασιλόπιτα ή Χριστουγεννιάτικο Κέικ με ξερά Φρούτα και Γιορτινά Αρώματα
BY: Greek Cooking Made Easy
SUBSCRIBE TO MY YOUTUBE CHANNEL: https://www.youtube.com/greekcookingmadeeasy
ΜΕΡΙΔΕΣ🍴⃒ ΠΡΟΕΤΟΙΜΑΣΙΑ 🕔⃒
12-16 30 min.
ΜΑΓΕΙΡΕΜΑ ♨ ΒΑΘΜ. ΔΥΣΚΟΛΙΑΣ 👩🍳⃒
40 min. Εύκολο
Όλα αυτά τα χρόνια, σας έχω δείξει πολλές εκδοχές της παραδοσιακής Βασιλόπιτας είτε σαν κέικ ή σαν ψωμί. Είναι αλήθεια ότι υπάρχουν πολλές παραλλαγές σε διαφορετικές περιφέρειες στην Ελλάδα.
Αυτή τη φορά, θα σας δείξω άλλη μια Βασιλόπιτα, γεμάτη με ξερά φρούτα, μέλι, πορτοκάλι, ξηρούς καρπούς και μπαχαρικά.
Είναι μια εύκολη συνταγή για να ακολουθήσετε, αλλά σημειώστε λίγα μυστικά στη μέθοδό μου.
Για να είμαι ειλικρινής αυτή η πίτα θα μπορούσε να σταθεί και σαν ένα υπέροχο ζουμερό χριστουγεννιάτικο Κέικ (χωρίς το νόμισμα) με όλα τα αρώματα της εορταστικής περιόδου!
Ας δούμε μαζί πώς να ετοιμάσουμε αυτό το ξεχωριστό κέικ.
Κατάλληλο για χορτοφάγους.
ΥΛΙΚΑ
Υλικά για το κέικ:
• 360 γρ. / 12,7 oz / 3 φλ. Αλεύρι που φουσκώνει μόνο του, κοσκινισμένο
• 250 γρ. / 9 oz Βούτυρο, σε θερμοκρασία δωματίου
• 4 μεγάλα Αυγά σε θερμοκρασία δωματίου
• 225 γρ. / 7,9 oz / λίγο περισσότερο από 1 φλ. καστανή Ζάχαρη
• 2 κ.σ. / 30 ml Θυμαρίσιο Μέλι
• 1 σφηνάκι / 30 ml Μπράντυ (κονιάκ)
• 250 ml / 1 φλ. φρέσκος χυμός Πορτοκαλιού
• 1 κ.γ. Μαγειρική Σόδα
• 1 κ.σ. Μπέικιν πάουντερ
• 1/2 κ.γ. Αλάτι
• 1 κ.γ. Κανέλα σκόνη
• 1/4 κ.γ. Γαρίφαλο σκόνη
• 50 γρ. / 1,7 oz ανάμεικτα Καρύδια και Αμύγδαλα, ψιλοκομμένα
• 80 γρ. / 2,8 oz αποξηραμένα Κράνμπερι
• 80 γρ. / 2,8 oz ξερά ανάμεικτα φρούτα, ψιλοκομμένα: χουρμάδες, σύκα και βερίκοκα (ή δαμάσκηνα)
• 50 γρ. / 1,7 oz Σταφιδούλες μαύρες
Υλικά για το γαρνίρισμα:
• 320 γρ. / 11,3 oz / 2 φλ. Ζάχαρη άχνη
• 60 ml / 4 κ.σ. φρέσκος χυμός Πορτοκαλιού
• 9 κόκκινες Καραμέλες ή κόκκινα μούρα
• 6-7 κλαδάκια Δεντρολίβανο, κομμένα σε μικρά κομμάτια
• 1 νόμισμα
ΜΕΘΟΔΟΣ:
Α. Ετοιμάστε τη ζύμη για το κέικ:
1. Τοποθετήστε το μαλακό βούτυρο στο μπολ ενός δυνατού ηλεκτρικού μίξερ. Αρχίστε να το χτυπάτε, προσθέτοντας και την καστανή ζάχαρη.
2. Χτυπήστε τα μαζί σε δυνατή ταχύτητα για 5' ή μέχρι να αφρατέψουν.
3. Στη συνέχεια, σπάστε τα 4 αυγά σε ένα ξεχωριστό μπολ και μετά προσθέστε τα ένα ένα στο μείγμα.
4. Ρίξτε μέσα και το μέλι.
5. Στο μπολ με το κοσκινισμένο αλεύρι προσθέστε την κανέλα, το γαρύφαλλο και το αλάτι, ανακατεύοντας να ενωθούν.
6. Σταματήστε το μίξερ για λίγο. Στο μπολ με τα ανάμεικτα, ψιλοκομμένα ξερά φρούτα προσθέστε τα κράνμπερι και τις σταφιδούλες, ανακατεύοντάς τα όλα μαζί.
7. Πάρτε μια-δυο κουταλιές από το αλεύρι και προσθέστε το στα ανάμεικτα φρούτα ανακατεύοντάς καλά. Προσθέστε και το μείγμα ξηρών καρπών. Βάλτε στην άκρη.
8. ΣΥΜΒΟΥΛΗ: Αυτό είναι ένα μικρό κόλπο για να κρατήσετε κατά το ψήσιμο τα ξερά φρούτα-που είναι βαριά-μέσα στο κέικ ώστε να μην κάτσουν στο πάτο!
9. Ξεκινήστε ξανά το μίξερ σε χαμηλή ταχύτητα και σταδιακά διπλώστε μέσα στη ζύμη το κοσκινισμένο μείγμα αλευριού, κουταλιά κουταλιά, ανακατεύοντάς απαλά.
10. Ρίξτε μέσα το κονιάκ.
11. Στα μισά, ρίξτε τη μαγειρική σόδα μέσα στο χυμό πορτοκαλιού και ανακατέψτε με το σύρμα για να αναμειχθεί.
12. Μόλις ο χυμός φουσκώσει και κάνει φουσκάλες, ρίξτε τον στη ζύμη πριν συνεχίσετε με το υπόλοιπο αλεύρι.
13. Προσθέστε το μείγμα από ξερά φρούτα και ξηρούς καρπούς και ανακατέψτε όσο χρειάζεται ώστε να ενωθούν.
14. Λίγο πριν σταματήσετε το μίξερ, προσθέστε το μπέικιν πάουντερ και χτυπήστε μόνο όσο χρειάζεται για να ενσωματωθεί.
15. Αλείψτε ή ψεκάστε λίγο λάδι σε μια στρογγυλή φόρμα με ελατήριο (με άνοιγμα στο πλάι-τσέρκι) των 28 εκ. / 11 in. , στο κάτω μέρος και στα πλαϊνά και πασπαλίστε τη με λίγο αλεύρι.
16. Σημείωση: Για πιο παχύ κέικ, μπορείτε να χρησιμοποιήσετε φόρμα με ελατήριο των 26 εκ. / 10 in.
17. Αδειάστε τη ζύμη του κέικ στη φόρμα και ισιώστε την επιφάνειά του. Τώρα είναι έτοιμο για ψήσιμο.
Β. Οδηγίες ψησίματος:
18. Τοποθετήστε τη φόρμα στη κάτω σχάρα ενός προθερμασμένου φούρνου, στις πάνω / κάτω αντιστάσεις στους @ 180℃ / 350℉, και ψήστε το κέικ για περίπου 40' (εξαρτάται από τον φούρνο).
19. Συμβουλή: Μην ανοίξετε τον φούρνο πριν τα 30' ψησίματος, γιατί θα ξεφουσκώσει το κέικ σας.
20. Μετά από 40' δοκιμάστε αν έχει ψηθεί το κέικ βάζοντας ένα μαχαίρι στο κέντρο του. Πρέπει να βγει καθαρό!
21. Αφαιρέστε το κέικ από το φούρνο, τοποθετώντας το στον πάγκο της κουζίνας για να κρυώσει. Το κέικ πρέπει να φαίνεται αφράτο.
22. Συμβουλή: Θα μπορούσατε να ετοιμάσετε το κέικ από πριν και να το ψήσετε, και κατόπιν να το φυλάξετε σε πλαστική σακούλα είτε στο ψυγείο για 1 εβδομάδα ή στην κατάψυξη για 1 μήνα.
Γ. Γαρνίρισμα και διακόσμηση της Βασιλόπιτας:
23. Όταν το κέικ κρυώσει εντελώς, αφαιρέστε τη στρογγυλή φόρμα.
24. Φέρτε δίπλα σας μια γιορτινή, στρογγυλή, πιατέλα σερβιρίσματος.
25. Ετοιμάστε και τοποθετήστε το νόμισμα σας: Πάρτε ένα μικρό κέρμα και τυλίξτε το σε αλουμινόχαρτο.
26. Τώρα αναποδογυρίστε το κέικ σε μια άλλη πιατέλα.
27. Σπρώξτε το νόμισμα να μπει στο κάτω μέρος της πίτας και αναποδογυρίστε τη για άλλη μια φορά στη γιορτινή πιατέλα.
28. Φτιάξτε ένα εύκολο γλάσο:
29. Σημείωση: Η πιο εύκολη και συνηθισμένη επιλογή για διακόσμηση Βασιλόπιτας είναι να πασπαλίσετε από πάνω λίγη ζάχαρη άχνη.
30. Για το γλάσο, χτυπήστε μαζί με το σύρμα τη ζάχαρη άχνη με το χυμό πορτοκαλιού.
31. Περιχύστε το γλάσο πάνω από το κέικ και γύρω από το χείλος ώστε να στάξει στα πλαϊνά.
32. Στη συνέχεια, βάλτε τα μικρά κλαδάκια δεντρολίβανου συν τις κόκκινες καραμέλες γύρω γύρω στο κέικ για να φτιάξετε ένα στεφάνι.
33. Η Βασιλόπιτα είναι πλέον έτοιμη να κοπεί και να μοιραστεί στην αλλαγή της χρονιάς.
Κάποιος θα έχει καλή τύχη του χρόνου!
Το σερβίρω φέτος με το δικό μου λικέρ από ρόδι.
Εδώ είναι και το τυχερό νόμισμα! Και κοιτάξτε το εσωτερικό αυτού του σούπερ ζουμερού, πλούσιου και πάνγευστου κέικ!
Καλή χρονιά, με υγεία αγαπημένοι μου φίλοι! Με αγάπη πάντα, Ντέπη!!
Δ. Πληροφορίες φύλαξης:
Φυλάξτε το κέικ στο ψυγείο, καλυμμένο με πλαστική μεμβράνη. Θα μείνει φρέσκο για 3-4 ημέρες. Βγάλτε το 2 ώρες πριν το σερβίρετε, μιας και είναι καλύτερο σε θερμοκρασία δωματίου.
Ε. Πρωτοχρονιάτικη παράδοση:
Η Βασιλόπιτα είναι ένα πολύ ιδιαίτερο γλύκισμα μιας και είναι το τελευταίο γλυκό της χρονιάς που φεύγει αλλά και το πρώτο της χρονιάς που έρχεται.
Η παράδοση είναι ότι η Βασιλόπιτα σερβίρεται τα μεσάνυχτα της παραμονής της Πρωτοχρονιάς για τον εορτασμό του Αγίου Βασιλείου (στην Ελλάδα γιορτάζουμε τον Άη Βασίλη αντί για τον Σάντα δηλ. τον Αγ. Νικόλαο, εξ ου και το όνομά της). Οι 2 Άγιοι είχαν κάποιες ομοιότητες στη ζωή τους και μπορείτε να διαβάσετε περισσότερα στη συνταγή μου για Πολίτικη Βασιλόπιτα!
Το κύριο γεγονός είναι βέβαια το κρυμμένο νόμισμα μέσα στην πίτα, που πιστεύεται ότι φέρνει καλή τύχη σε αυτόν που θα το βρει την νέα χρονιά! Έτσι, η προσμονή και αγωνία για το ποιος θα πάρει το τυχερό νόμισμα είναι τεράστια μεταξύ των καλεσμένων του σπιτιού!
Αυτό το υπέροχο Ελληνικό έθιμο συνεχίζεται συνήθως και τους επόμενους δύο μήνες σε γραφεία, συλλόγους και σχολεία.
Κοιτάξτε επίσης την συνταγή μου σε YouTube βίντεο, το λίνκ είναι: ΕΔΩ