
Greek Feta Cheese Bread aka Tiropsomo
🥖 Εύκολο Τυρόψωμο
You won't believe how good this is
🥖✚🧀
You won't believe how good this is 🥖✚🧀

Greek Feta Cheese Bread aka Tiropsomo
BY: Greek Cooking Made Easy
SUBSCRIBE TO MY YOUTUBE CHANNEL: https://www.youtube.com/greekcookingmadeeasy
Check my YouTube Video: HERE
Κοιτάξτε επίσης την συνταγή μου σε YouTube βίντεο, το λίνκ είναι: ΕΔΩ
SERVES 🍴⃒ PREP. TIME 🕔⃒
2 loaves enough 20 min + 2 hrs wait
for 8 p.
COOK. TIME ♨ DIFFIC. LEVEL 👩🍳⃒
40-45 min Easy
Tbh I do love tasting all kinds of bread. And this one is really special! A very easy to prepare homemade bread that is filled with feta cheese and herbs.
Homely, tangy and rustic it's the kind of bread that tastes similar to Tyropita (cheese pie) but with the earthy bread taste. All over Greece, you will find varieties of this bread with the "Thrace Tiropsomo" being the most popular.
Simply put, just think about this: is there a better combination than bread + cheese? I don't think so!
Would you like to try making this beautiful Bread? Check my recipe!
Suitable for lacto-ovo vegetarians.
P.S. Tiropsomo is a compound Greek word meaning: Cheese within bread.
INGREDIENTS:
Ingredients for the dough:
· 300 gr. / 10.5 oz / 2.4 cups Bread Flour (strong)
· 3/4 cup / 187.5 ml Water, lukewarm
· 20 gr. / 0.7 oz Fresh Yeast
· 1/2 tsp. Sugar
· 1/2 tsp. Salt
· A bit Olive Oil

Ingredients for stuffing and garnishing:
· 200 gr. / 7 oz Feta cheese, finely crumbled in a food processor
· 1/2 tbsp. dried Mint (or fresh, finely chopped)
· 2 tbsp. / 30 ml Extra Virgin Olive Oil
· Some ground black Pepper
· 1 small Egg mixed with
· 1 tbsp. / 15 ml fresh Milk
· About 2.1 tbsp. / 20 gr. / 0.7 oz Sesame Seeds
· 1/3 tbsp. / 3 gr. / 0.1 oz Black Sesame Seeds

METHOD:
A. Prepare the dough:
1. Pour 1/3 of the lukewarm water in a bowl adding the fresh yeast and sugar.
2. Whisk to mix them together, making sure the yeast is completely dissolved.
3. Leave the mix for 20' to rest and for the yeast to activate.

4. Next pour the rest of water in the bowl of an electric mixer with the hook adjustment.
5. Add the salt and then gradually start adding the flour, spoon by spoon, beating slowly to blend it in.
6. Pour the dissolved yeast mix in the dough and continue beating.
7. After about 5', you will notice that the dough becomes one mass (lump) around the hook and has detached from the bowl. Stop the mixer!
8. The dough should be elastic, soft but not sticky! Place the dough in a plate or bowl.
9. Brush the mixer's bowl with a bit of olive oil.

10.Return the dough in the oiled bowl.
11.Place a clean kitchen towel on top of the bowl with the dough.
12.It now needs time to rest, but also for the yeast to activate and to help it rise.
13.You could either place the covered dough near a warm source (like by a window near the sun or a radiator) or put it in the oven setting: “Dough Proving” like I did.
14.The dough needs 1h-1h 30' to rise.
B. Make the stuffing:
15.In the meantime, place finely crumbled feta cheese in a large bowl.
16.Season with some black pepper.
17.Pour on top the EVOO and dried mint, pressed between your palms to release its aromas.
18.Using a large spoon, mix all stuffing ingredients very well.
19.Tip: The stuffing can also be done earlier in the day and be stored, covered in the fridge.

20.Blend together sesame and black sesame seeds.
21.Break the egg in a small bowl, whisk it and add the milk, blending it in. Reserve.
22.After a bit more than 1h, remove the kitchen towel from the bowl. You will see that the dough has quadrupled in size.

23.Return under the mixer and start beating gently.
24.Add the feta mix in the dough and beat just enough to incorporate them.
25.Stop the mixer.
C. Make the Tiropsomo loaves:
26.Line a large oven tray with parchment paper and brush a bit olive oil on it.
27.Take out the dough and divide it in two halves, shaping them like loaves.
28.Place them on the oven tray with some space between them.

29.Brush the egg-milk mixture on both loaves and then sprinkle the sesame mix on top.

30.When both loaves are shaped and garnished, set them aside for 40', so they can rest and rise once more. I returned them in the oven for some more "Dough Proving".
31.Ready for some delicious baking.
D. Baking instructions:
32.Bake Tiropsomo in a preheated oven, FAN @180 ℃ / 350 ℉ for 40'-45' or until both loaves are golden and fluffy (depends on the oven).
33.Note: In my case, I had to add 10' to the total baking time for the oven to be heated, since breads were already in for proving!
34.After about 45' the bread loaves (tiropsomo) should be ready. Remove from the oven.
35.Wow the smells in my kitchen.
E. Serving suggestion:
36.Place the tray with Tiropsomo loaves on the kitchen bench and let them cool down. Cut and serve!

Scrumptious, fluffy and so appetizing! Its taste is out of this world!

It can be eaten at home, school, work, anytime of day as a snack or to accompany any meal you prepare-either with vegetables, meat or chicken.
For example, I served it for lunch just with a Greek Village-Horiatiki Salad.

Here it is served to dip in homemade Hummus.
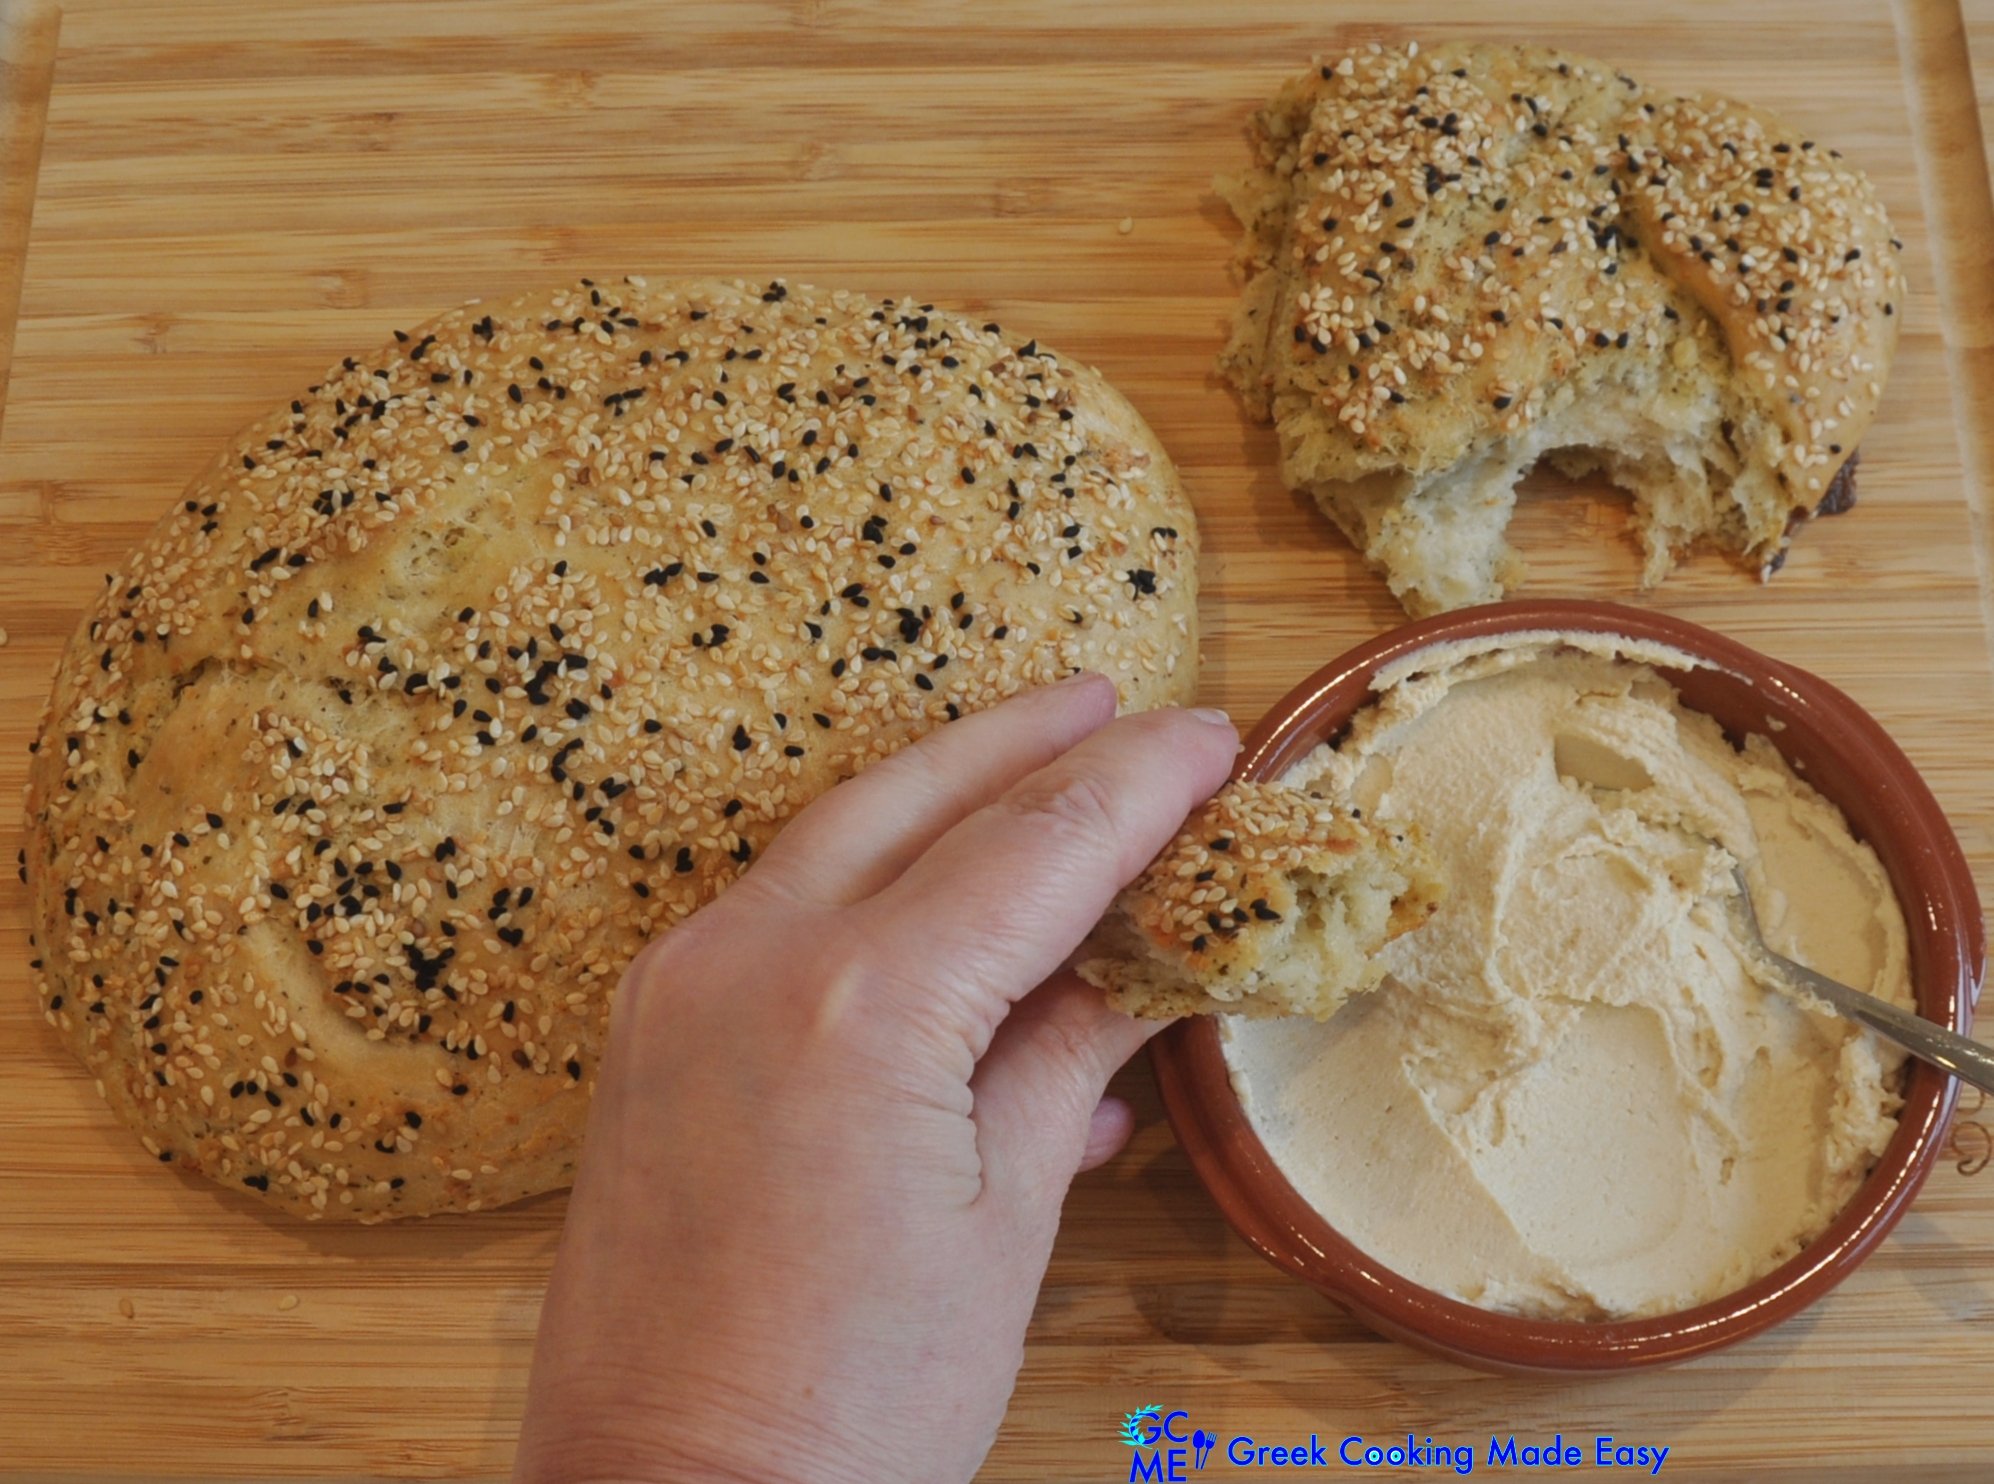
Crazy delicious or as we say in Greek "Lahtaristo"!

You won't believe how good this is! I hope you'll enjoy it like I did! Ooops, the camera caught me stealing a piece!

F. Storage Info:
After it cools down, Tiropsomo can be stored in plastic wrap, in the fridge for 1 week, or in the freezer for 1 month. Reheat it before serving it again.

Check my YouTube Video: HERE

Εύκολο Τυρόψωμο
BY: Greek Cooking Made Easy
SUBSCRIBE TO MY YOUTUBE CHANNEL: https://www.youtube.com/greekcookingmadeeasy
ΜΕΡΙΔΕΣ🍴⃒ ΠΡΟΕΤΟΙΜΑΣΙΑ 🕔⃒
2 καρβέλια 20 min. + 2 ώρες αναμονή
για 8 άτομα
ΜΑΓΕΙΡΕΜΑ ♨ ΒΑΘΜ. ΔΥΣΚΟΛΙΑΣ 👩🍳⃒
40-45 min. Εύκολο
Για να πω την αλήθεια μου αρέσει να δοκιμάζω όλα τα είδη ψωμιού. Και αυτό το ψωμί είναι πραγματικά ξεχωριστό! Ένα πανεύκολο σπιτικό ψωμί γεμάτο με φέτα και μυρωδικά.
Σπιτικό, πικάντικο και χωριάτικο έχει γεύση παρόμοια με την Τυρόπιτα αλλά με τη γήινη γεύση του ψωμιού. Σε όλη την Ελλάδα θα βρείτε ποικιλίες αυτού του ψωμιού με πιο δημοφιλές το «Θρακιώτικο Τυρόψωμο».
Με απλά λόγια, σκεφτείτε μόνο αυτό: υπάρχει καλύτερος συνδυασμός από ψωμί + τυρί; Δεν νομίζω!
Θα θέλατε να δοκιμάσετε να φτιάξετε αυτό το πανέμορφο ψωμί; Δείτε τη συνταγή μου!
Κατάλληλο για χορτοφάγους.
ΥΛΙΚΑ:
Υλικά για τη ζύμη:
• 300 γρ. / 10,5 oz / 2,4 φλ. Αλεύρι για ψωμί (ή σκληρό)
• 3/4 φλ. / 187,5 ml Νερό, χλιαρό
• 20 γρ. / 0,7 oz φρέσκια Μαγιά
• 1/2 κ.γ. Ζάχαρη
• 1/2 κ.γ. Αλάτι
• Λίγο Ελαιόλαδο
Υλικά για τη γέμιση και το γαρνίρισμα:
• 200 γρ. / 7 oz τυρί Φέτα, θρυμματισμένη ψιλά στο μούλτι
• 1/2 κ.σ. Δυόσμος ξερός (ή φρέσκος, ψιλοκομμένος)
• 2 κ.σ. / 30 ml Εξαιρετικό Παρθένο Ελαιόλαδο
• Λίγο φρεσκοαλεσμένο μαύρο Πιπέρι
• 1 μικρό Αυγό αναμεμειγμένο με
• 1 κ.σ. / 15 ml φρέσκο Γάλα
• Περίπου 2,1 κ.σ. / 20 γρ. / 0,7 oz Σουσάμι
• 1/3 κ.σ. / 3 γρ. / 0,1 oz Μαυροκούκι
ΜΕΘΟΔΟΣ:
Α. Ετοιμάστε τη ζύμη:
1. Ρίξτε το 1/3 από το χλιαρό νερό σε ένα μπολ προσθέτοντας τη φρέσκια μαγιά και τη ζάχαρη.
2. Χτυπήστε με το σύρμα να ανακατευτούν μεταξύ τους, μέχρι να διαλυθεί τελείως η μαγιά.
3. Αφήστε το μείγμα για 20' να ξεκουραστεί και να ενεργοποιηθεί η μαγιά.
4. Στη συνέχεια, ρίξτε το υπόλοιπο νερό στο μπολ ενός ηλεκτρικού μίξερ με το εξάρτημα γάντζο.
5. Προσθέστε το αλάτι και μετά αρχίστε σταδιακά να προσθέτετε το αλεύρι, κουταλιά-κουταλιά, χτυπώντας αργά μέχρι να ομογενοποιηθεί.
6. Χύστε κατόπιν το μείγμα της διαλυμένης μαγιάς στη ζύμη και συνεχίστε το χτύπημα.
7. Μετά από 5' περίπου, θα παρατηρήσετε ότι η ζύμη γίνεται μια μάζα (σβόλος) γύρω από το γάντζο και έχει αποκολληθεί από το κάδο. Σταματήστε το μίξερ!
8. Η ζύμη πρέπει να είναι ελαστική, μαλακή αλλά να μην κολλάει! Τοποθετήστε τη ζύμη σε ένα πιάτο ή μπολ.
9. Αλείψτε με πινέλο το κάδο του μίξερ με λίγο ελαιόλαδο.
10. Επιστρέψτε τη ζύμη στο λαδωμένο κάδο.
11. Τοποθετήστε μια καθαρή πετσέτα κουζίνας πάνω από το κάδο με τη ζύμη.
12. Τώρα η ζύμη χρειάζεται χρόνο για να ξεκουραστεί, αλλά και να ενεργοποιηθεί η μαγιά και να τη βοηθήσει να φουσκώσει.
13. Θα μπορούσατε είτε να τοποθετήσετε τη σκεπασμένη ζύμη κοντά σε μια ζεστή πηγή (όπως δίπλα σε ένα παράθυρο κοντά στον ήλιο ή σε καλοριφέρ) είτε να τη βάλετε στη ρύθμιση του φούρνου: “Φούσκωμα Ζύμης” όπως έκανα εγώ.
14. Η ζύμη χρειάζεται 1h-1h 30' για να φουσκώσει.
Β. Φτιάξτε τη γέμιση:
15. Στο μεταξύ, σε ένα μεγάλο μπολ βάλτε τη ψιλοτριμμένη φέτα.
16. Καρυκέψτε με λίγο μαύρο πιπέρι.
17. Ρίξτε από πάνω το ελαιόλαδο και τον ξερό δυόσμο, πιεσμένο ανάμεσα στις παλάμες σας για να απελευθερώσει τα αρώματά του.
18. Με ένα μεγάλο κουτάλι ανακατέψτε πολύ καλά όλα τα υλικά της γέμισης.
19. Συμβουλή: Η γέμιση μπορεί να γίνει και νωρίτερα μέσα στη μέρα και να διατηρηθεί σκεπασμένη στο ψυγείο.

20. Ανακατέψτε μαζί το σουσάμι και το μαυροκούκι.
21. Σπάστε το αυγό σε ένα μικρό μπολ, χτυπήστε το με σύρμα και προσθέστε το γάλα ανακατεύοντάς το να ενσωματωθεί. Κρατήστε το στην άκρη.
22. Μετά από λίγο παραπάνω από 1 ώρα, αφαιρέστε την πετσέτα κουζίνας από το κάδο. Θα δείτε ότι η ζύμη έχει τετραπλασιαστεί σε μέγεθος.
23. Επιστρέψτε το κάδο κάτω από το μίξερ και αρχίστε να χτυπάτε απαλά.
24. Προσθέστε το μείγμα φέτας στη ζύμη και χτυπήστε τα μαζί μόνο όσο χρειάζεται για να ενσωματωθούν.
25. Σταματήστε το μίξερ.
Γ. Φτιάξτε τα καρβέλια Τυρόψωμου:
26. Στρώστε μια λαμαρίνα με λαδόκολλα και αλείψτε με λίγο ελαιόλαδο.
27. Βγάλτε τη ζύμη και χωρίστε τη στα δύο πλάθοντάς τα σαν καρβέλια.
28. Βάλτε τα στο ταψί με κάποια απόσταση μεταξύ τους.
29. Αλείψτε και τα δύο καρβέλια με το μείγμα αυγού-γάλακτος και μετά πασπαλίστε από πάνω το μείγμα σουσαμιού.
30. Μόλις πλάσετε και γαρνίρετε και τα δύο καρβέλια, αφήστε τα στην άκρη για 40', ώστε να ξεκουραστούν και να φουσκώσουν για άλλη μια φορά. Εγώ τα επέστρεψα στο φούρνο για λίγο ακόμα "Φούσκωμα ζύμης".
31. Έτοιμα για νόστιμο ψήσιμο.
Δ. Οδηγίες ψησίματος:
32. Ψήστε τα Τυρόψωμα σε προθερμασμένο φούρνο, στον αέρα @180 ℃ / 350 ℉ για 40'-45' ή μέχρι και τα δύο καρβέλια να ροδίσουν και να φουσκώσουν (εξαρτάται από τον φούρνο).
33. Σημείωση: Στην περίπτωσή μου έπρεπε να προσθέσω 10' στο συνολικό χρόνο ψησίματος για να ζεσταθεί καλά ο φούρνος, μιας και τα ψωμιά ήταν ήδη μέσα στο πρόγραμμα "Φούσκωμα ζύμης"!
34. Μετά από 45' περίπου τα τυρόψωμα πρέπει να είναι έτοιμα. Αφαιρέστε τα από το φούρνο.
35. Ουάου οι μυρωδιές στην κουζίνα μου.
Ε. Πρόταση σερβιρίσματος:
36. Τοποθετήστε το ταψί με τα καρβέλια στον πάγκο της κουζίνας και αφήστε τα να κρυώσουν καλά. Κόψτε και σερβίρετε!
Πεντανόστιμα, αφράτα και τόσο ορεκτικά! Η γεύση τους είναι πραγματικά απίστευτη!
Το Τυρόψωμο μπορεί να καταναλωθεί στο σπίτι, στο σχολείο, στη δουλειά, οποιαδήποτε ώρα της ημέρας σα σνακ ή για να συνοδεύσετε οποιοδήποτε γεύμα ετοιμάζετε -είτε με λαχανικά, κρέας ή κοτόπουλο.
Για παράδειγμα, το σέρβιρα για μεσημεριανό μόνο με μια χωριάτικη σαλάτα.
Εδώ σερβίρεται για βουτηχτές σε σπιτικό χούμους.
Τόσο Λαχταριστό!

Δεν θα πιστεύετε πόσο νόστιμο είναι! Ελπίζω να το απολαύσετε όπως κι εγώ! Ουπς, με έπιασε η κάμερα να κλέβω λίγο!
Ζ. Πληροφορίες φύλαξης:
Αφού κρυώσει, το Τυρόψωμο μπορεί να φυλαχτεί σε πλαστική μεμβράνη στο ψυγείο για 1 βδομάδα ή στη κατάψυξη για μήνα. Ξαναζεστάνετε το πριν το φάτε.
Κοιτάξτε επίσης την συνταγή μου σε YouTube βίντεο, το λίνκ είναι: ΕΔΩ