
Glorious Greek Moussaka with Zucchini and Potatoes
🥘 Ένδοξος Μουσακάς με Κολοκύθια και Πατάτες

Serves 6-8 Persons
There are humble foods and there are glorious foods. Moussaka definitely belongs in the 2nd category. Moussaka is the famous Greek dish that tourists recognize and want to taste when visiting Greece.
There are many debates on what constitutes the perfect Moussaka and many versions to try. Traditionally Moussaka is prepared only with eggplants (aubergines).
In this recipe, I use potatoes and zucchini instead of eggplants, for those who are allergic to them. It’s also a lighter, healthier version since I am not frying my veggies!
It takes some time to prepare but I promise you it’s definitely worth the effort!
Check all my variations (versions) of Moussaka HERE
INGREDIENTS:
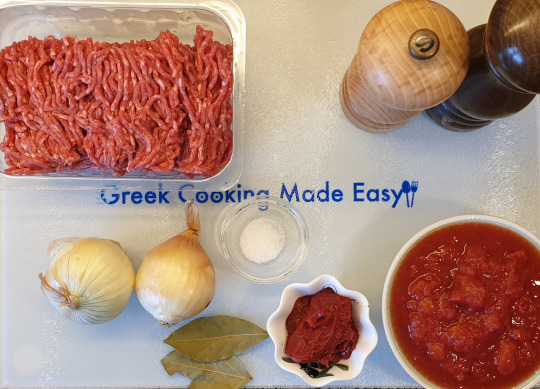
Ingredients for the ground meat sauce:
• 600 gr / 1 lb 5.5 oz Ground Beef
• 200 gr / 7 oz Tomato Sauce with chopped tomatoes
• 2.5 tbsp. Tomato Paste (Puree)
• 70-80 ml/ 0.3 cup Vegetable Oil
• 2 small or 1 large Onion, finely chopped
• 1 tsp. Sugar
• 2 Bay leaves
• Ground Salt and Pepper
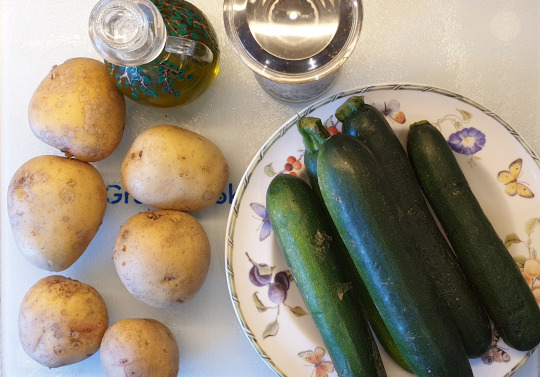
Ingredients for the Vegetables:
• 600 gr/ 1 lb 5.5 oz large Zucchini (courgettes)
• 900 gr / 2 lb / 4-5 medium Potatoes
• Some Olive oil
• Ground Salt and Pepper
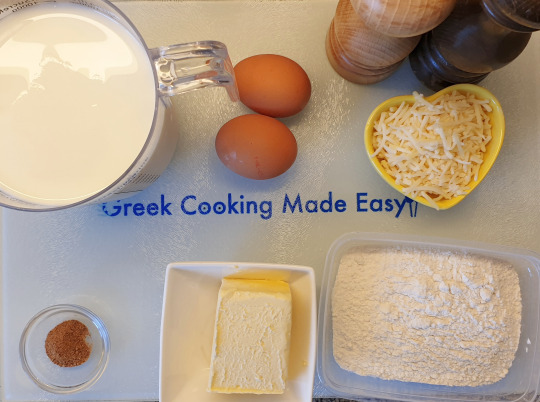
Ingredients for the Béchamel sauce:
• 1 lt / 4 cups Fresh Milk, semi-skimmed, very HOT!!
• 100 gr / 3.5 oz / a bit less than 0.5 cup Margarine
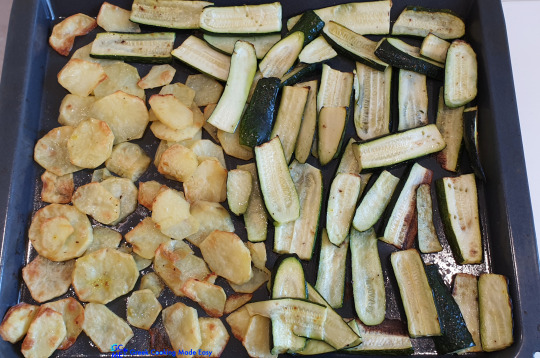
• 100 gr / 3.5 oz / 0.8 cup All-purpose Flour
• 2 medium Eggs
• 1/2 tsp. ground Nutmeg
• 100 gr / 3.5 oz / almost 1 cup grated Kefalotyri or Graviera Cheese (altern: Pecorino)
• Ground Salt and Pepper
METHOD:
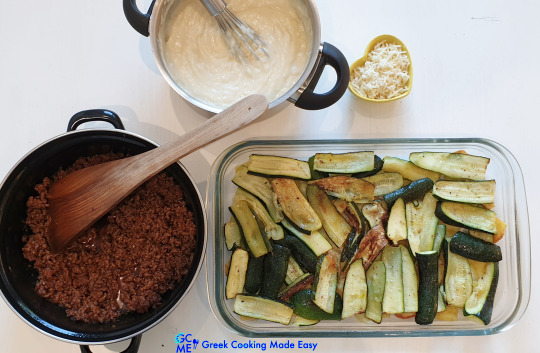
A. Make the Ground meat sauce earlier:
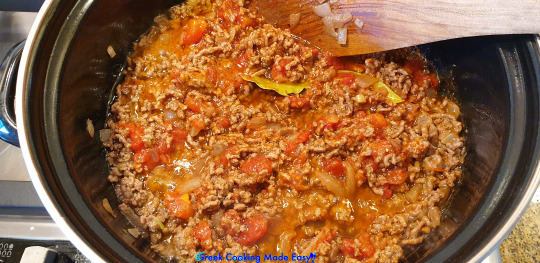
1. Pour some vegetable oil into a deep pan, over medium-high heat.
2. When hot, add the chopped onion. Let it sauté for 2'-3'.
3. Then add the ground beef, breaking it into small pieces with your hands & the wooden spatula. Let it sauté for 5'-6' until brown all around, stirring regularly.
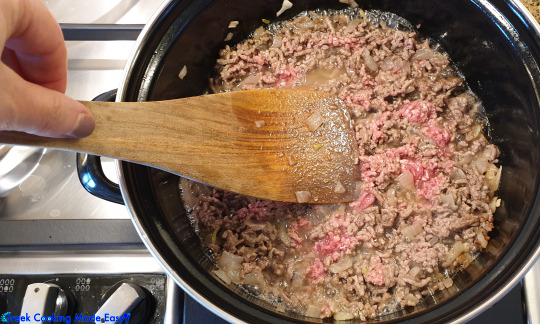
4. Reduce heat, add the sugar & season with ground Salt and pepper, to taste. Mix to blend them in.
5. Add next the tomato paste and tomato sauce.
6. Dip the bay leaves in the sauce.
7. Let the sauce simmer for 10' (no need to add water).
8. Then, turn off the heat. Let it cool down.
9. TIP: You can prepare the ground meat sauce the previous day and store it in the fridge, to lessen the work.
B. Prepare the Vegetables:
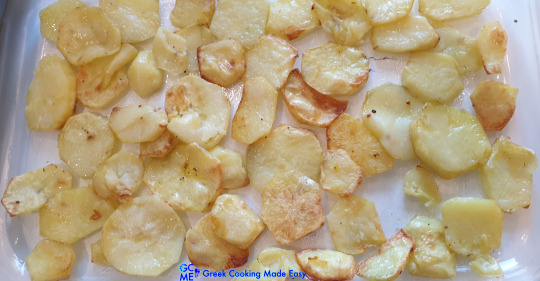
10. Instead of frying, I bake the veggies in the oven for a quicker, healthier & lighter result!
11. First peel and wash the potatoes since they need more oven time. Put them in a bowl with cold water.
12. Cut them in thin rounds.
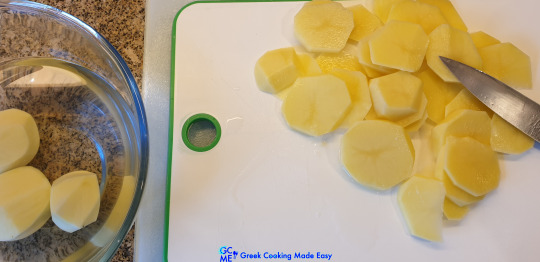
13. Rinse them, remove the water, drizzle some olive oil and season them with Salt and Pepper on top. Mix them with your hands or a spoon.
14. Brush some Olive Oil on a large Oven tray.
15. Spread the potato rounds in a single layer on its bottom (they should take about ½ of the space).
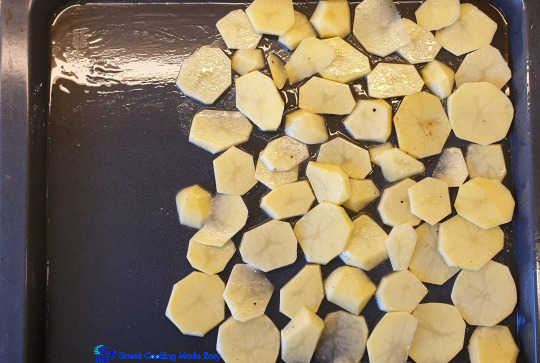
16. Bake potato rounds in a preheated oven Fan @190℃/ 375℉ for 10'.
17. In the meantime, wash the zucchini (courgettes).
18. Remove their stem and bottom.
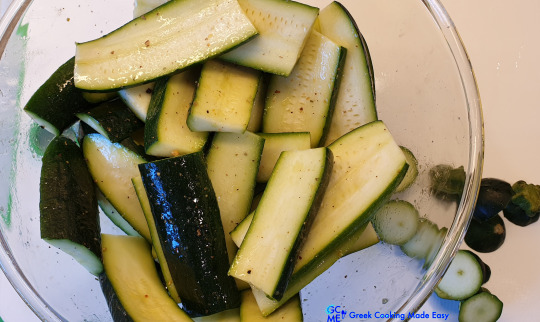
19. Cut them vertically in thin, long slices (strips), and cut them in half. Place them in a bowl.
20. Drizzle some olive oil and season them with Salt and Pepper on top.
21. Then mix all ingredients with your hands.
22. After 10' in the oven, remove the tray with potatoes and place it on the kitchen bench. Don’t turn off the oven.
23. Flip the potato rounds and move them a bit to the side to make room for the zucchini slices.
24. Spread them on the tray.
25. Return tray in the oven and bake zucchinis AND potato rounds together in a preheated oven Fan @190℃/375℉ for 20' more.
26. After 20', remove them from the oven and let them cool down.
C. Prepare the Béchamel sauce:
27. Place a medium, wide saucepan over medium heat. Add the margarine.
28. When it starts to melt, lower heat, add the flour and whisk continuously as you sauté it.
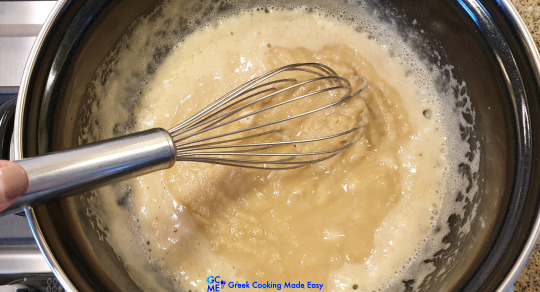
29. Then add the hot milk.
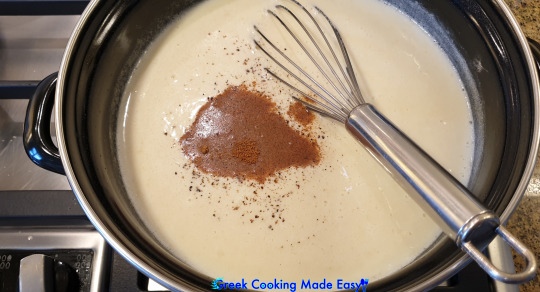
30. Season with ground salt and pepper. Add the ground nutmeg.
31. Whisk until milk thickens & is absorbed in the mixture continuously, in order to avoid lumps forming in the sauce!
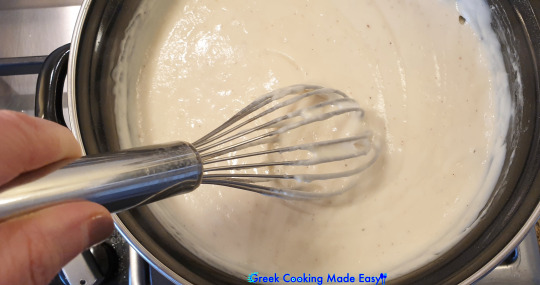
32. You will know béchamel sauce is ready when it starts to thicken, makes bubbles and the whisk leaves streaks on its surface.
33. Turn off the heat.
34. Leave béchamel sauce aside to cool down a bit, stirring it regularly to prevent a crust forming on top.
35. When béchamel sauce has cooled down and just before you add it on top of the Moussaka, pour the 2 beaten egg and blend them in with a whisk.

D. Assembling the Moussaka:
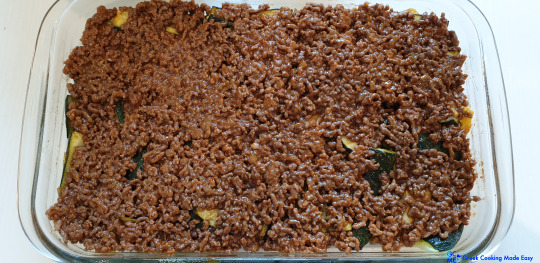
36. Brush or spray some oil in a large, rectangle Pyrex dish 23 x 35 cm / 9 x 14 in.
37. Start by placing a layer of potato rounds at the bottom to cover it completely (use all potatoes).
38. Continue by placing a layer of zucchini slices on top of the potatoes (use them all).
39. Season with some more ground salt and pepper.
40. Spread the ground meat sauce over the vegetable layers (remove the bay leaves).
41. Level its surface.
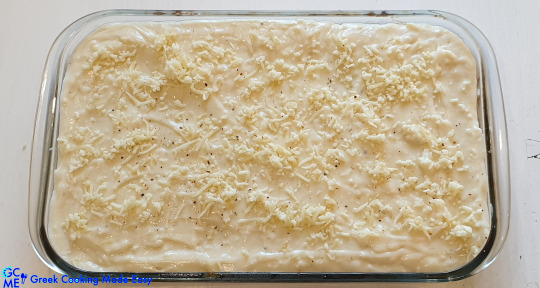
42. Now, pour béchamel sauce over the meat sauce and with a spoon smooth the top.
43. Sprinkle the grated cheese on top.
44. Optionally, you can also season with a bit more salt and pepper on top. Ready for the oven!
E. Baking Instructions:
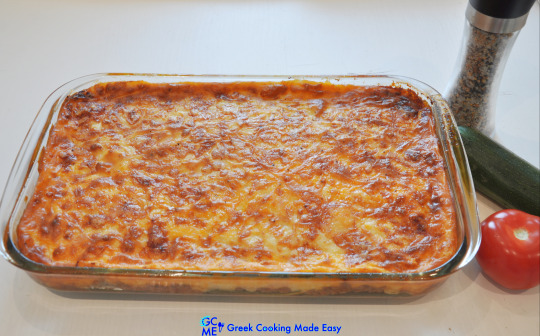
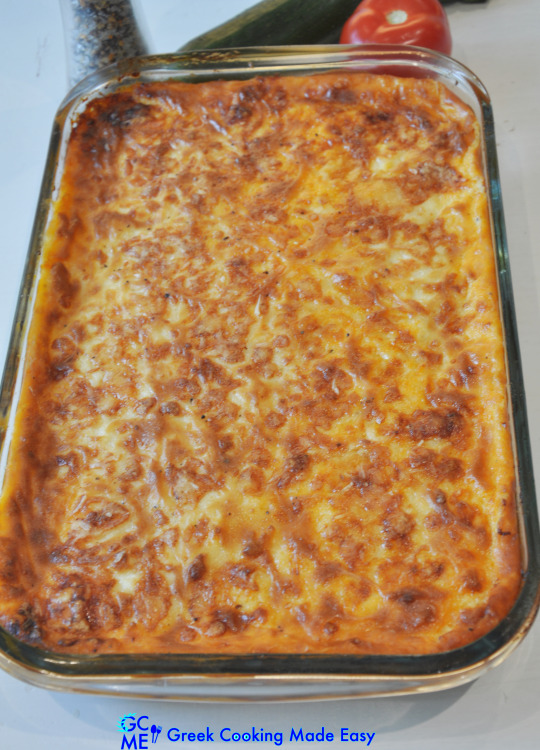
45. Bake Moussaka in a preheated oven Fan @180℃/ 350℉ for 50'-55' or until it turns golden brown (depends on the oven).
46. After about 50', remove the tray from the oven.
47. Leave Moussaka to rest for a while before serving.
F. Serving suggestions:
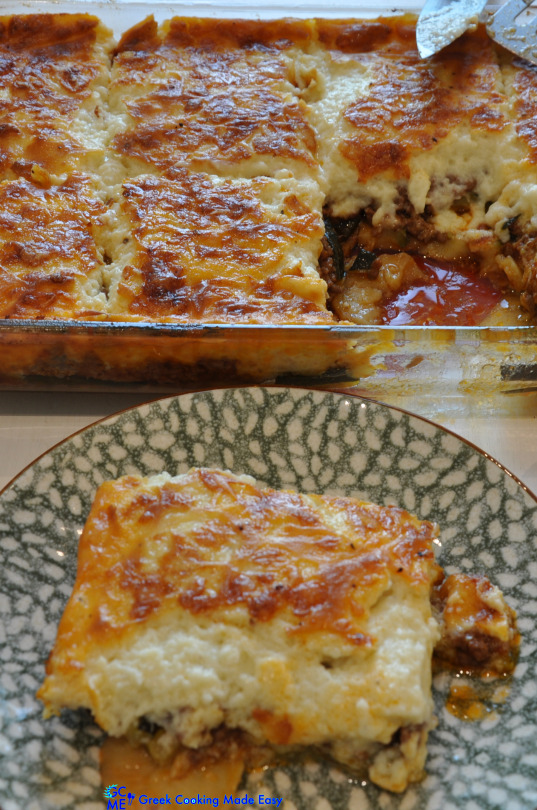
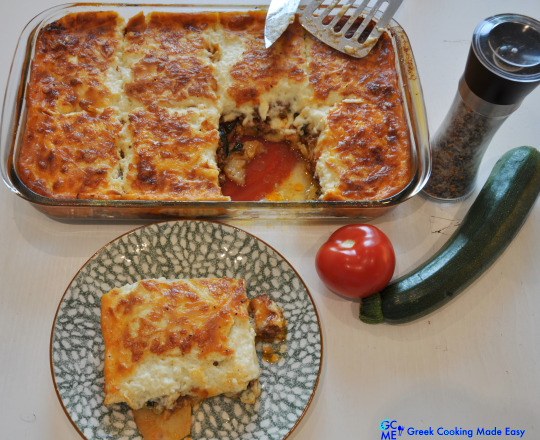
When it cools down a bit, divide it into large slices and serve! It can also be served @ room temp!

“Kopiaste sto trapezi mou”, you are welcome to my table!
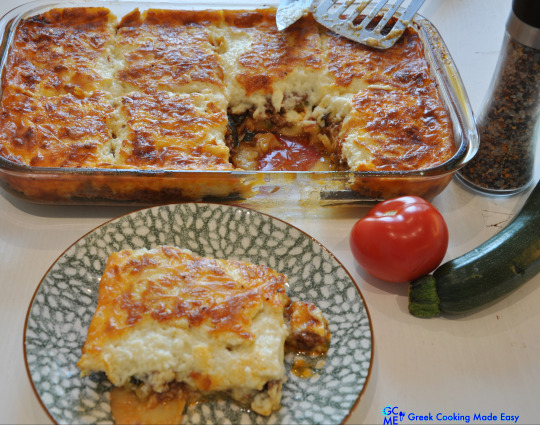
Guaranteed to be a family favorite. A gorgeous dish, containing all the ingredients the whole family will love!
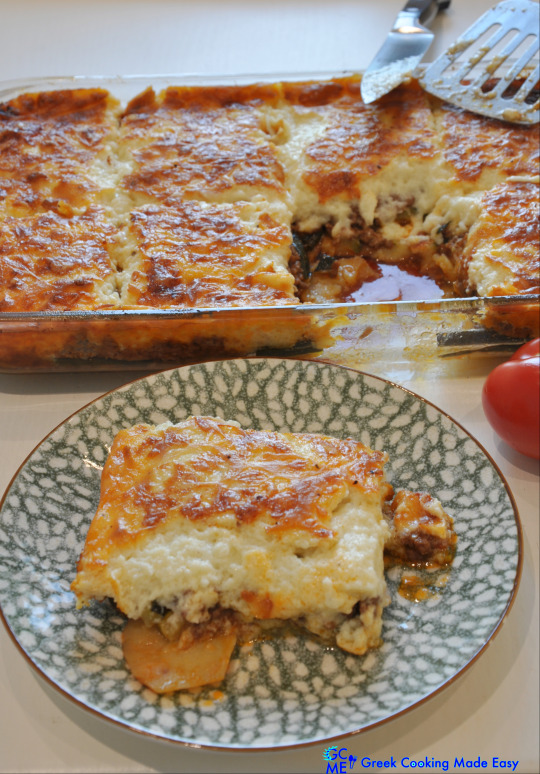
The vegetables are infused with the juices from the ground meat sauce, making them practically irresistible. A great way to get your kids to eat their veggies.
Tip: They do say, Moussaka tastes even better the next day after you cook it, but the question is: Can you wait THAT long with all the smells in the kitchen 😋?!

Golden excellence, layers and layers of deliicousness! Our treasured, Moreish Moussaka!
G. Storage Info:
Moussaka can be stored in the fridge (in an airtight container) for 1 week or in the freezer for 1 month.
H. Greece travel Tip:
With Arabic origins, Moussaka became "Greek" from the renowned chef Tselemendes @1st half of 20th century.
The gorgeous Cycladic island of Sifnos-homeland of the renowned chef - has a history of culinary excellence. Visit it to experience what great, authentic Greek food tastes like!
A similar Tselemendes Recipe is for Pastitsio! Check it HERE

Check my YouTube Video: HERE
Ένδοξος Μουσακάς με Κολοκύθια και Πατάτες
BY: Greek Cooking Made Easy
SUBSCRIBE TO MY YOUTUBE CHANNEL: https://www.youtube.com/greekcookingmadeeasy
Σερβίρει 6-8 άτομα
Υπάρχουν ταπεινά φαγητά και υπάρχουν ένδοξα φαγητά. Ο Μουσακάς ανήκει σίγουρα στη 2η κατηγορία. Ο Μουσακάς είναι το διάσημο Ελληνικό φαγητό που όλοι οι τουρίστες αναγνωρίζουν και θέλουν να δοκιμάσουν όταν επισκέπτονται την Ελλάδα.
Υπάρχουν πολλές συζητήσεις για το τι αποτελεί τον τέλειο Μουσακά και πολλές εκδοχές για να δοκιμάσετε! Παραδοσιακά, ο Μουσακάς ετοιμάζεται μόνο με μελιτζάνες.
Σε αυτή τη συνταγή χρησιμοποιώ πατάτες και κολοκύθια αντί για μελιτζάνες, για όσους έχουν αλλεργία σε αυτές. Είναι επίσης ελαφρύτερη, πιο υγιεινή εκδοχή μιας και δεν τηγανίζω τα λαχανικά μου!
Χρειάζεται λίγο παραπάνω χρόνος για να ετοιμαστεί, αλλά σας υπόσχομαι ότι αξίζει το κόπο!
Κοιτάξτε όλες τις Συνταγές μου (παραλλαγές-εκδοχές) για Μουσακά ΕΔΩ
ΥΛΙΚΑ:
Υλικά για τη σάλτσα Κιμά:
• 600 γρ / 1 lb 5,5 oz Κιμάς Μοσχαρίσιος
• 200 γρ / 7 oz Σάλτσα ντομάτας με κομματάκια (κονκασε)
• 2,5 κ.σ. Ντοματοπελτές
• 70-80 ml / 0,3 φλ. φυτικό Λάδι
• 2 μικρά ή 1 μεγάλο ξερό Κρεμμύδι, ψιλοκομμένο
• 1 κ.γ. Ζάχαρη
• 2 φύλλα Δάφνης
• Φρεσκοαλεσμένο Αλάτι και Πιπέρι
Υλικά για τα λαχανικά:
• 600 γρ / 1 lb 5,5 oz Κολοκύθια μεγάλα
• 900 γρ / 2 lb / 4-5 μεσαίες Πατάτες
• Λίγο Ελαιόλαδο
• Φρεσκοαλεσμένο Αλάτι και Πιπέρι
Υλικά για τη σάλτσα Μπεσαμέλ:
• 1 lt / 4 φλ. Φρέσκο Γάλα ημίπαχο, πολύ ζεστό!!
• 100 γρ / 3,5 oz / λίγο λιγότερο από 0,5 φλ. Μαργαρίνη
• 100 γρ / 3,5 oz / 0,8 φλ. Αλεύρι για όλες τις χρήσεις
• 2 μεσαία Αυγά
• 1/2 κ.γ. αλεσμένο Μοσχοκάρυδο
• 100 γρ / 3,5 oz / σχεδόν 1 φλιτζάνι τριμμένο Κεφαλοτύρι ή Γραβιέρα (εναλλακτικά: Πεκορίνο)
• Φρεσκοαλεσμένο Αλάτι και Πιπέρι
ΜΕΘΟΔΟΣ:
Α. Φτιάξτε τη σάλτσα κιμά νωρίτερα:
1. Ρίξτε λίγο λάδι σε μια κατσαρόλα, πάνω από μέτρια προς δυνατή φωτιά.
2. Μόλις ζεσταθεί, προσθέστε το ψιλοκομμένο κρεμμύδι. Αφήστε το να σοταριστεί για 2'-3'.
3. Στη συνέχεια προσθέστε το κιμά, σπάζοντάς τον σε μικρά κομμάτια με τα χέρια σας και την ξύλινη σπάτουλα. Αφήστε τον να σοταριστεί για 5'-6' μέχρι να ροδίσει, ανακατεύοντας τακτικά.
4. Χαμηλώστε τη φωτιά, προσθέστε τη ζάχαρη και αλατοπιπερώστε. Ανακατέψτε τα για να ομογενοποιηθούν.
5. Προσθέστε στη συνέχεια το Ντοματοπελτέ και τη σάλτσα ντομάτα.
6. Βουτήξτε τα φύλλα δάφνης μέσα στη σάλτσα.
7. Αφήστε τη σάλτσα να σιγοβράσει για 10' (δεν χρειάζεται να προσθέσετε νερό).
8. Στη συνέχεια, σβήστε τη φωτιά. Αφήστε το κιμά να κρυώσει.
9. ΣΥΜΒΟΥΛΗ: Μπορείτε να ετοιμάσετε τη σάλτσα κιμά την προηγούμενη ημέρα και να την φυλάξετε στο ψυγείο, για να μειώσετε την δουλειά σας.
Β. Ετοιμάστε τα λαχανικά:
10. Αντί να τηγανίσω, ψήνω τα λαχανικά στο φούρνο για πιο γρήγορο και ελαφρύτερο αποτέλεσμα!
11. Ξεφλουδίστε πρώτα και πλύντε τις πατάτες αφού χρειάζονται περισσότερο χρόνο στο φούρνο. Βάλτε τις σε ένα μπολ με κρύο νερό.
12. Κόψτε τις σε λεπτές ροδέλες.
13. Ξεπλύνετε τις, αφαιρέστε το νερό, πασπαλίστε πάνω τους λίγο ελαιόλαδο και αλατοπιπερώστε τις. Ανακατέψτε τις με τα χέρια σας ή ένα κουτάλι.
14. Βουρτσίστε λίγο ελαιόλαδο σε μια μεγάλη λαμαρίνα.
15. Απλώστε τις ροδέλες πατάτας σε μια μόνο στρώση στο ταψί (θα πρέπει να καταλαμβάνουν περίπου το ½ του χώρου).
16. Ψήστε τις πατάτες σε προθερμασμένο φούρνο στο ζεστό αέρα @ 190 ℃ / 375 ℉ για 10'.
17. Στο μεταξύ, πλύντε τα κολοκύθια.
18. Αφαιρέστε το κοτσάνι και το κάτω μέρος τους.
19. Κόψτε τα κάθετα σε λεπτές στενόμακρες φέτες (σα λωρίδες), και αυτές στη μέση. Τοποθετήστε τις σε ένα μπολ.
20. Πασπαλίστε τις με λίγο ελαιόλαδο και αλατοπιπερώστε τις.
21. Στη συνέχεια, ανακατέψτε όλα τα υλικά με τα χέρια σας.
22. Μετά από 10' στο φούρνο, αφαιρέστε τη λαμαρίνα με τις πατάτες και βάλτε τον στον πάγκο της κουζίνας. Μην σβήσετε το φούρνο.
23. Αναποδογυρίστε πρώτα και μετά μετακινήστε τις πατάτες στο πλάι για να αφήσετε χώρο για τα κολοκύθια.
24. Απλώστε τα κολοκύθια στη λαμαρίνα.
25. Επιστρέψτε το ταψί στο φούρνο και ψήστε τα κολοκύθια ΚΑΙ τις πατάτες μαζί σε προθερμασμένο φούρνο στο ζεστό αέρα @ 190 ℃ / 375 ℉ για 20' ακόμα.
26. Μετά από 20', αφαιρέστε το ταψί από το φούρνο και αφήστε τα λαχανικά να κρυώσουν.
Γ. Ετοιμάστε τη σάλτσα Béchamel:
27. Τοποθετήστε μια πλασοτέ κατσαρόλα σε μέτρια φωτιά.
28. Προσθέστε τη μαργαρίνη.
29. Όταν αρχίσει να λιώνει, χαμηλώστε τη φωτιά, προσθέστε το αλεύρι και ανακατεύετε συνεχώς καθώς το τσιγαρίζετε.
30. Στη συνέχεια, προσθέστε το ζεστό γάλα.
31. Αλατοπιπερώστε. Προσθέστε το μοσχοκάρυδο.
32. Ανακατεύετε με το σύρμα έως ότου το γάλα αρχίσει να πήζει και να απορροφηθεί στο μείγμα συνεχώς, για να αποφύγετε το σχηματισμό σβώλων μέσα στη μπεσαμέλ!
33. Θα καταλάβετε ότι η σάλτσα μπεσαμέλ είναι έτοιμη όταν αρχίσει να πυκνώνει και να δένει, κάνει φυσαλίδες και το σύρμα αφήνει ραβδώσεις στην επιφάνειά της.
34. Σβήστε τη φωτιά.
35. Αφήστε τη σάλτσα μπεσαμέλ στην άκρη για να κρυώσει, ανακατεύοντας τακτικά για να αποφευχθεί η δημιουργία κρούστας.
36. Μόλις η σάλτσα μπεσαμέλ έχει κρυώσει και λίγο και πριν τη βάλετε πάνω από το κιμά, προσθέστε της τα 2 χτυπημένα αυγά και ανακατέψτε τα καλά με το σύρμα.
Δ. Συναρμολόγηση του μουσακά:
37. Λαδώστε με πινέλο ή ψεκάστε ένα μεγάλο, στενόμακρο ταψί Pyrex 23 x 35 cm / 9 x 14 in.
38. Ξεκινήστε τοποθετώντας ένα στρώμα από ροδέλες πατάτας στο κάτω μέρος του ταψιού για να το καλύψετε τελείως (χρησιμοποιήστε όλες τις πατάτες).
39. Συνεχίστε τοποθετώντας ένα στρώμα από κολοκύθια πάνω από τις πατάτες (χρησιμοποιήστε όλες τις φέτες κολοκυθιών).
40. Προσθέστε λίγο ακόμα αλατοπίπερο.
41. Απλώστε κατόπιν παντού τη σάλτσα κιμά πάνω από τα στρώματα λαχανικών, ισιώνοντας την επιφάνεια της (αφαιρέστε τα φύλλα δάφνης).
42. Τώρα ρίξτε τη σάλτσα μπεσαμέλ πάνω από τη σάλτσα κιμά, και με ένα κουτάλι ισιώστε την επιφάνεια!
43. Πασπαλίστε το τριμμένο τυρί από πάνω.
44. Προαιρετικά, μπορείτε επίσης να προσθέσετε λίγο ακόμα αλατοπίπερο από πάνω.΄Ετοιμος ο Μουσακάς μας για το φούρνο!
Ε. Οδηγίες Ψησίματος:
45. Ψήστε το Μουσακά σε προθερμασμένο φούρνο, στο ζεστό αέρα @180℃/350℉ για 50'-55' ή έως ότου χρυσίσει (εξαρτάται από το φούρνο).
46. Μετά από περίπου 50', αφαιρέστε το ταψί από το φούρνο.
47. Αφήστε το Μουσακά να ξεκουραστεί για λίγο πριν σερβίρετε.
Ζ. Προτάσεις σερβιρίσματος:
Όταν κρυώσει λίγο, κόψτε τον σε μεγάλα κομμάτια και σερβίρετε! Μπορεί να σερβιριστεί και σε θερμοκρασία δωματίου!
“Κοπιάστε στο τραπέζι μου”!
Εγγυημένα αγαπημένο της οικογένειας. Ένα υπέροχο πιάτο, με όλα τα υλικά που θα λατρέψει όλη η οικογένεια!
Τα λαχανικά εμπλουτίζονται με τους χυμούς από τη σάλτσα κιμά, και είναι πρακτικά ακαταμάχητα. Ένας πολύ καλός τρόπος για να να φάνε τα παιδιά σας τα λαχανικά τους.
Συμβουλή: Λένε ότι ο Μουσακάς έχει καλύτερη γεύση την επόμενη μέρα μετά το μαγείρεμα, αλλά η ερώτηση είναι: Μπορείτε να περιμένετε τόσο πολύ με τόσες μυρωδιές στη κουζίνα σας;!
Χρυσή Τελειότητα! Στρώσεις και στρώσεις απόλαυσης! Ο πολυαγαπημένος μας, θεσπέσιος Μουσακάς!
Η. Πληροφορίες Φύλαξης:
Ο Μουσακάς μπορεί να φυλαχθεί στο ψυγείο (σε αεροστεγή συσκευασία) για 1 εβδομάδα ή στη κατάψυξη για 1 μήνα.
Θ. Τουριστικός Οδηγός Ελλάδας:
Με αραβική καταγωγή, ο Μουσακάς έγινε «Ελληνικός» από τον διάσημο σεφ Τσελεμεντέ @ 1ο μισό του 20ου αιώνα.
Το πανέμορφο κυκλαδίτικο νησί της Σίφνου - πατρίδα του διάσημου σεφ - έχει ιστορία γαστρονομικής αριστείας. Επισκεφθείτε το για να γευθείτε υπέροχη, αυθεντική Ελληνική κουζίνα!
Άλλη μια παρόμοια Συνταγή του Τσελεμεντέ είναι το Παστίτσιο! Δείτε το ΕΔΩ
Κοιτάξτε επίσης την συνταγή μου σε YouTube βίντεο, το λίνκ είναι: ΕΔΩ