
Baked Feta Pasta with Prawns
🍝 Ζυμαρικά με ψητή Φέτα, Ντοματάκια και Γαρίδες στο Φούρνο
An alternative to the Baked Feta Pasta Craze!
🦐
An alternative to the Baked Feta Pasta Craze! 🦐

Serves 3-4 persons
Have you heard of the amazing Greek style recipe for “Baked Feta Pasta” which has become the new craze and has taken the Internet by storm? Since I have tried it a few times already and loved how simple and tasty it is, I decided to experiment by adding other ingredients, hence the addition of prawns.
So now you have a new Greek recipe, with a delish, timeless combo of pasta with prawns and cheese, which I am certain will delight you.
Let’s find out together how to prepare it, shall we?!
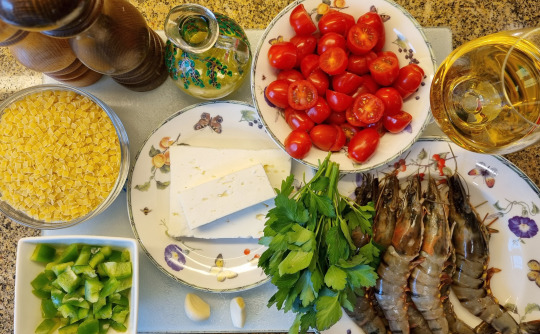
INGREDIENTS:
• 250 gr / 9 oz Country Mini Pasta ‘Hylopitaki’ type (or any small pasta)
• 1 Block / 200 gr / 7 oz Greek Feta Cheese
• 250 gr / 9 oz / 6-8 large (tiger) raw Prawns, whole, fresh or frozen & thawed
• 1 tsp. dry Oregano
• 45 ml / 3 tbsp. Olive Oil
• 300 gr / 10.5 oz Fresh, Grape Mini Tomatoes, washed and halved
• 2 Garlic cloves
• ½ Green Pepper (capsicum), washed and diced
• ½ cup / 125 ml White Wine
• ½ bunch Fresh Parsley
• Ground Salt and Pepper
METHOD:
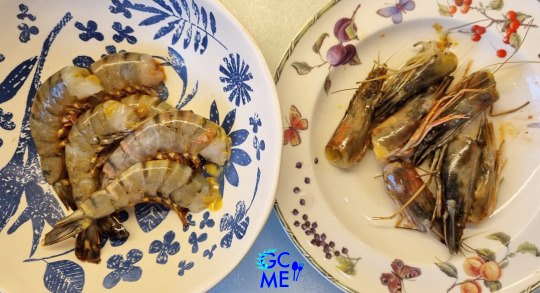
A. Prepare and marinate the Prawns (Gambas), 1 hour before baking the dish:
1. Wash the (thawed) whole prawns and remove their heads only! Place prawns in a deep bowl, reserving their heads in a separate plate.
2. Pour the wine and 1 tsp. olive oil in a food processor, adding also the 2 garlic cloves.
3. Add half of the parsley as well and beat them together for 1’ or until they turn into a green, runny sauce.
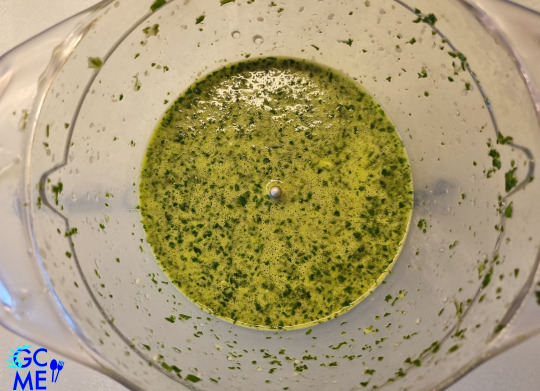
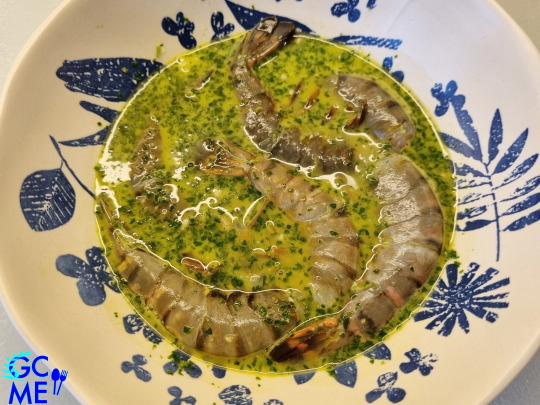
4. Pour the sauce on top of the bowl with prawns, cover it with plastic wrap and store in the fridge for 1 hour.
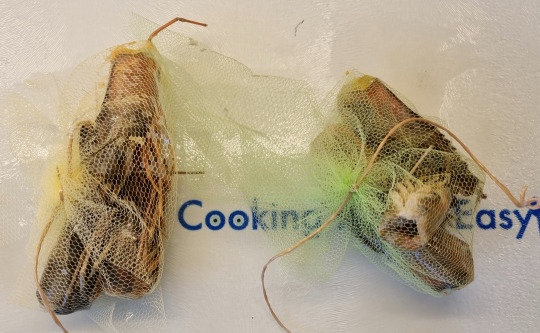
5. Put the heads in 2 small pouches made of tulle and using a string, tie a knot on top of each one to close it tight.
6. Reserve.
B. Prepare the feta and prawns for baking:
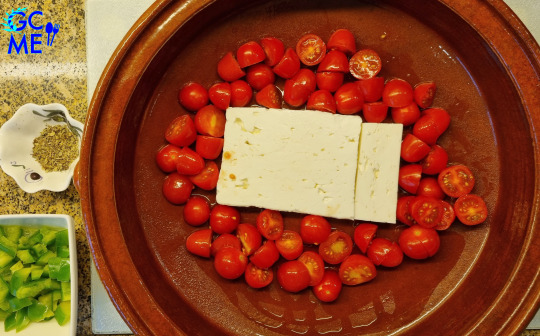
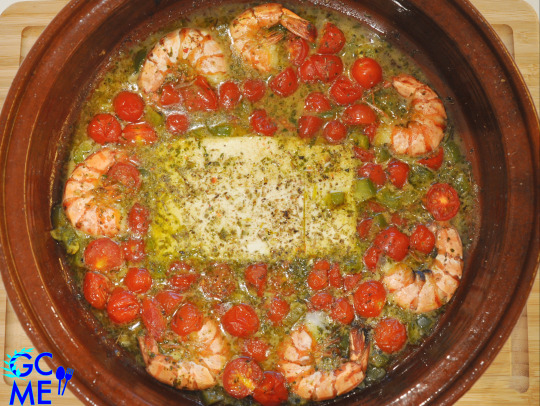
7. Pour 2 tbsp. olive oil, preferably in a large clay pot of 28 cm/11 in. diameter or if you don’t have, in any round oven tray with same size.
8. Place the block of feta cheese in the center of the dish.
9. Around it scatter the halved mini tomatoes.
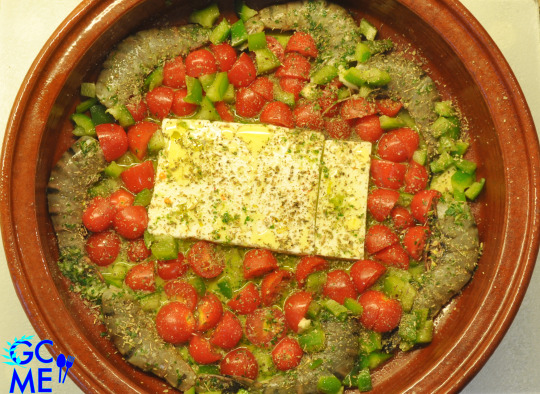
10. Bring the marinated prawns from the fridge and place them around the edges of the oven tray, pouring the green sauce on top of all the ingredients.
11. Scatter all around the cubed green pepper.
12. Season with ground Salt and Pepper, to taste.
13. To finish, drizzle a bit more olive oil (2 tsp.) and rub and sprinkle the oregano on top of all the ingredients.
14. Ready for the oven.
C. Baking Instructions:
15. Bake the feta dish in a preheated oven FAN @190 ℃/375 ℉ until the cheese has softened, prawns turn dark pink and mini tomatoes are roasted, for about 22’-25’ (depends on the oven).
D. Boil the Pasta:
16. While feta with prawns are being baked, pour 1.5 lt. boiled water in a large pot, over high heat.
17. Submerge the 2 pouches with the prawns’ heads in the water (that’s to give pasta the special prawns’ taste).
18. Bring water to a boil again, lower heat and add some salt.
19. Now add the pasta.

20. Cook pasta until al dente, 9’-11’ (check the package for cooking instructions too), stirring regularly.
21. While pasta is being boiled, open the oven and flip the prawns in the oven tray. Continue with baking.
22. After about 11’, pasta should be boiled.
23. Remove from the stove and drain it.
24. Take out the small pouches and discard them.
25. Reserve.
E. Finish the dish:
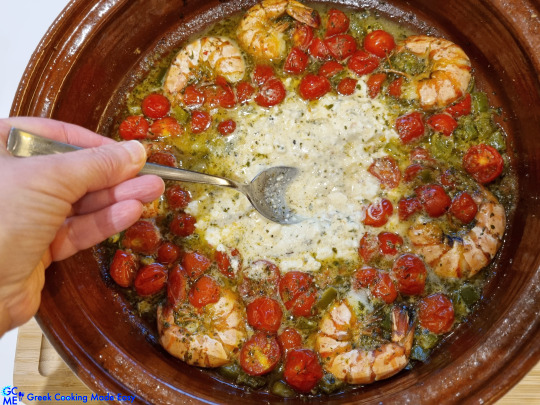
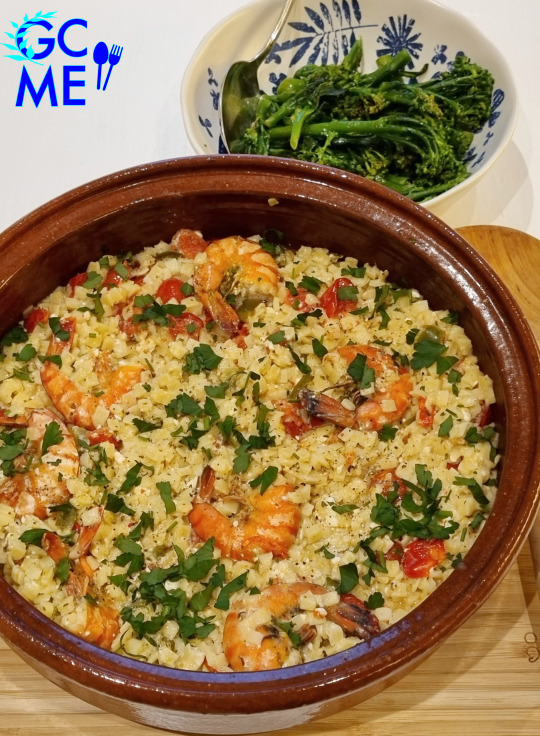
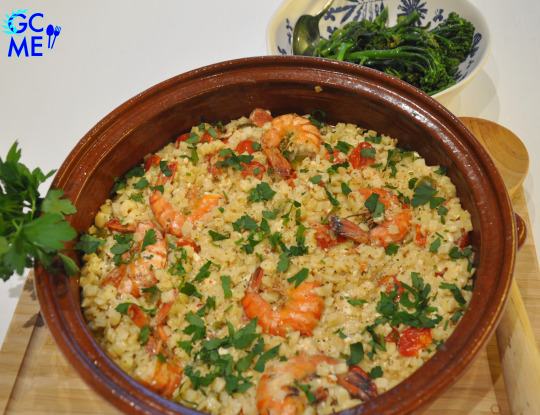
26. Remove the baking dish from the oven.
27. Already it looks divine!
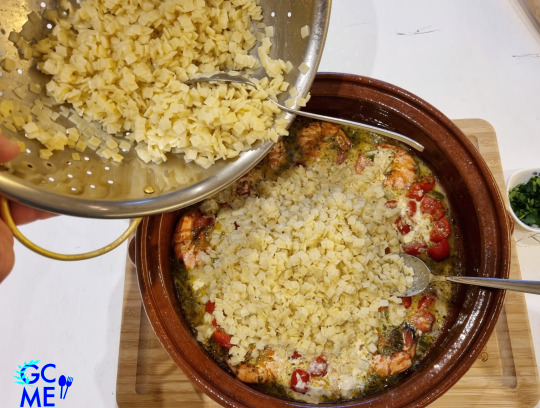
28. Using a large spoon, mash the feta and then mix it together with the prawns, tomatoes and other ingredients.
29. Add pasta to the baking dish, stirring to combine all ingredients well.
30. Season with a bit more salt and pepper, if you want.
31. Sprinkle the rest of chopped parsley on top of the dish.
32. The meal is ready!! Sooo easy! And the rich sauce from feta and prawns has infused the pasta…

F. Serving suggestion:
Place a generous portion on each plate and… serve while still hot.
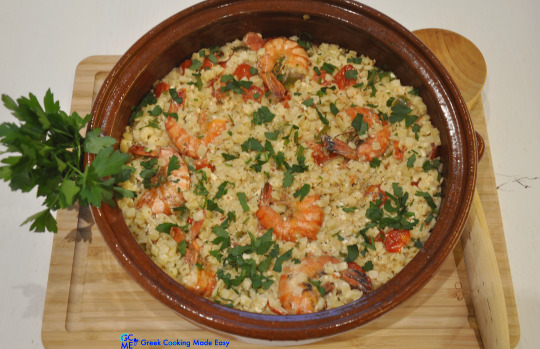

This dish is practically a whole meal. I just served it with steamed broccolini.
Well guys, with such an exceptional combo of tastes and easiness in preparation how can you go wrong!?
In my plate now, ready to be devoured, ttyl!
Other ideas-recipes with prawns? Check them all HERE

Enjoy it!

G. Storage info:
Leftovers (although I highly doubt there will be any…) can be stored, in an airtight container, in the fridge for up to 1 week.
Check my YouTube Video: HERE
Ζυμαρικά με ψητή Φέτα, Ντοματάκια και Γαρίδες στο Φούρνο
BY: Greek Cooking Made Easy
SUBSCRIBE TO MY YOUTUBE CHANNEL: https://www.youtube.com/greekcookingmadeeasy
Σερβίρει 3-4 άτομα
Έχετε ακούσει για την καταπληκτική Ελληνική συνταγή για «Ζυμαρικά με Φέτα στο φούρνο» που είναι η νέα τρέλα και έχει κατακλύσει το Διαδίκτυο; Μιας και το έχω ήδη δοκιμάσει αρκετές φορές και μου αρέσει το πόσο απλό και νόστιμο είναι, αποφάσισα να πειραματιστώ προσθέτοντας άλλα υλικά, εξ ου και η προσθήκη γαρίδων.
Τώρα λοιπόν έχετε μια νέα συνταγή, με έναν απολαυστικό, διαχρονικό συνδυασμό ζυμαρικών με γαρίδες και τυρί, που είμαι σίγουρη ότι θα σας ενθουσιάσει.
Τι λέτε, πάμε να μάθουμε μαζί πώς να το ετοιμάσουμε!?
ΥΛΙΚΑ:
• 250 γρ / 9 oz Χωριάτικο Χυλοπιτάκι (ή οποιοδήποτε άλλο μικρό ζυμαρικό)
• 1 Μπλοκ / 200 γρ / 7 oz Φέτα
• 250 γρ / 9 oz / 6-8 ολόκληρες, ωμές Γαρίδες Tiger (μεγάλες), φρέσκες ή κατεψυγμένες (& αποψυγμένες)
• 1 κ.γ. ξερή Ρίγανη
• 45 ml / 3 κ.σ. Ελαιόλαδο
• 300 γρ / 10,5 oz φρέσκα Ντοματάκια μακρόστενα, πλυμένα και κομμένα στη μέση
• 2 σκελίδες Σκόρδο
• ½ πράσινη Πιπεριά, πλυμένη και κομμένη σε καρέ
• ½ φλ. / 125 ml Λευκό Κρασί
• ½ ματσάκι φρέσκος Μαϊντανός
• Φρεσκοαλεσμένο αλάτι και πιπέρι
ΜΕΘΟΔΟΣ:
Α. Ετοιμάστε και μαρινάρετε τις Γαρίδες, 1 ώρα πριν ψήσετε το φαγητό:
1. Πλύντε τις ολόκληρες γαρίδες και αφαιρέστε μόνο το κεφάλι τους! Τοποθετήστε τις γαρίδες σε ένα βαθύ μπολ, κρατώντας τα κεφάλια τους σε ένα ξεχωριστό πιάτο.
2. Ρίξτε το κρασί και 1 κ.γ. ελαιόλαδο στο μούλτι, προσθέτοντας και τις 2 σκελίδες σκόρδο.
3. Προσθέστε και το μισό μαϊντανό και χτυπήστε τα μαζί για 1’ ή μέχρι να γίνουν μια πράσινη, ρευστή (αραιή) σάλτσα.
4. Ρίξτε τη σάλτσα πάνω από το μπολ με τις γαρίδες, σκεπάστε το με πλαστική μεμβράνη και αφήστε το στο ψυγείο για 1 ώρα.
5. Βάλτε τα κεφάλια σε 2 μικρά πουγκάκια από τούλι και με ένα σπάγκο δέστε έναν κόμπο πάνω από το καθένα για να κλείσει σφιχτά.
6. Βάλτε τα στην άκρη.
Β. Ετοιμάστε τη φέτα με τις γαρίδες για ψήσιμο:
7. Ρίξτε 2 κ.σ. ελαιόλαδο, κατά προτίμηση σε ένα μεγάλο πήλινο σκεύος-γάστρα διαμέτρου 28 εκ. / 11 in. ή αν δεν έχετε, σε οποιοδήποτε στρογγυλό ταψί φούρνου ίδιου μεγέθους.
8. Βάλτε το μπλοκ φέτας στο κέντρο του ταψιού.
9. Γύρω της σκορπίστε τα κομμένα στη μέση ντοματάκια.
10. Βγάλτε τις μαριναρισμένες γαρίδες από το ψυγείο και τοποθετήστε τις στις άκρες του ταψιού, περιχύνοντας την πράσινη σάλτσα πάνω από όλα τα υλικά.
11. Σκορπίστε γύρω-γύρω την πιπεριά σε καρέ.
12. Αλατοπιπερώστε, κατά βούληση.
13. Για να τελειώσετε, περιχύστε λίγο ακόμα ελαιόλαδο (2 κ.γ.) και τρίψτε και πασπαλίστε τη ρίγανη πάνω από όλα τα υλικά.
14. Έτοιμο για το φούρνο.
Γ. Οδηγίες ψησίματος:
15. Ψήστε τη φέτα με τις γαρίδες σε προθερμασμένο φούρνο στον αέρα @190 ℃/375 ℉ μέχρι να μαλακώσει το τυρί, οι γαρίδες να πάρουν σκούρο ροζ χρώμα και τα ντοματάκια να ψηθούν, για περίπου 22’-25’ (εξαρτάται από τον φούρνο).
Δ. Βράστε τα ζυμαρικά:
16. Όσο ψήνεται η φέτα με τις γαρίδες, ρίξτε 1,5 λτ. βραστό νερό σε βαθιά κατσαρόλα, πάνω από δυνατή φωτιά.
17. Βυθίστε τα 2 πουγκάκια με τα κεφάλια των γαρίδων μέσα στο νερό (για να δώσετε στα ζυμαρικά την σπέσιαλ γεύση της γαρίδας).
18. Μόλις αρχίσει να βράζει πάλι το νερό, χαμηλώστε τη φωτιά και προσθέστε λίγο αλάτι.
19. Τώρα προσθέστε και το χυλοπιτάκι.
20. Μαγειρέψτε το al dente δηλ. 9’-11’ (ελέγξτε και τη συσκευασία για οδηγίες μαγειρέματος), ανακατεύοντας τακτικά.
21. Όσο βράζουν τα ζυμαρικά, ανοίξτε το φούρνο και αναποδογυρίστε τις γαρίδες στο ταψί. Συνεχίστε με το ψήσιμο.
22. Μετά από 11’ περίπου, το χυλοπιτάκι πρέπει να έχει βράσει.
23. Αφαιρέστε από τη φωτιά και στραγγίστε το.
24. Βγάλτε τα πουγκάκια και πετάξτε τα.
25. Βάλτε το χυλοπιτάκι στην άκρη.
Ε. Τελειώστε το φαγητό:
26. Βγάλτε το ταψί από το φούρνο.
27. Ήδη φαίνεται θεϊκό!
28. Με ένα μεγάλο κουτάλι πολτοποιήστε τη φέτα και μετά ανακατέψτε τη μαζί με τις γαρίδες, τις ντομάτες και τα υπόλοιπα υλικά.
29. Προσθέστε το βρασμένο χυλοπιτάκι στο ταψί, ανακατεύοντας να ενωθούν καλά όλα τα υλικά.
30. Αλατοπιπερώστε και πάλι, αν θέλετε.
31. Πάνω από τη γάστρα πασπαλίστε τον υπόλοιπο μαϊντανό, ψιλοκομμένο.
32. Το γεύμα είναι έτοιμο!! Τόσο εύκολα! Και η πλούσια σάλτσα με γεύση φέτας και γαρίδας έχει ποτίσει τα ζυμαρικά…
Ζ. Πρόταση σερβιρίσματος:
Τοποθετήστε μια γενναιόδωρη μερίδα σε κάθε πιάτο και… σερβίρετε όσο είναι ακόμα ζεστά.
Αυτό το πιάτο είναι πρακτικά ένα πλήρες γεύμα. Το σέρβιρα απλά με μπροκολίνι στον ατμό.
Λοιπόν παιδιά, με ένα τόσο εκπληκτικό συνδυασμό γεύσεων και απλότητα στην ετοιμασία πώς μπορείτε να κάνετε λάθος!;
Στο πιάτο μου τώρα, έτοιμο να καταβροχθιστεί, τα λέμε!
Άλλες Συνταγές-Ιδέες με μεγάλες Γαρίδες? Δείτε τις όλες ΕΔΩ
Απολαύστε το!
Η. Πληροφορίες φύλαξης:
Τα υπολείμματα (αν και πολύ αμφιβάλλω ότι θα υπάρχουν…) μπορούν να φυλαχτούν, σε αεροστεγές δοχείο, στο ψυγείο για έως και 1 εβδομάδα.
Κοιτάξτε επίσης την συνταγή μου σε YouTube βίντεο, το λίνκ είναι: ΕΔΩ